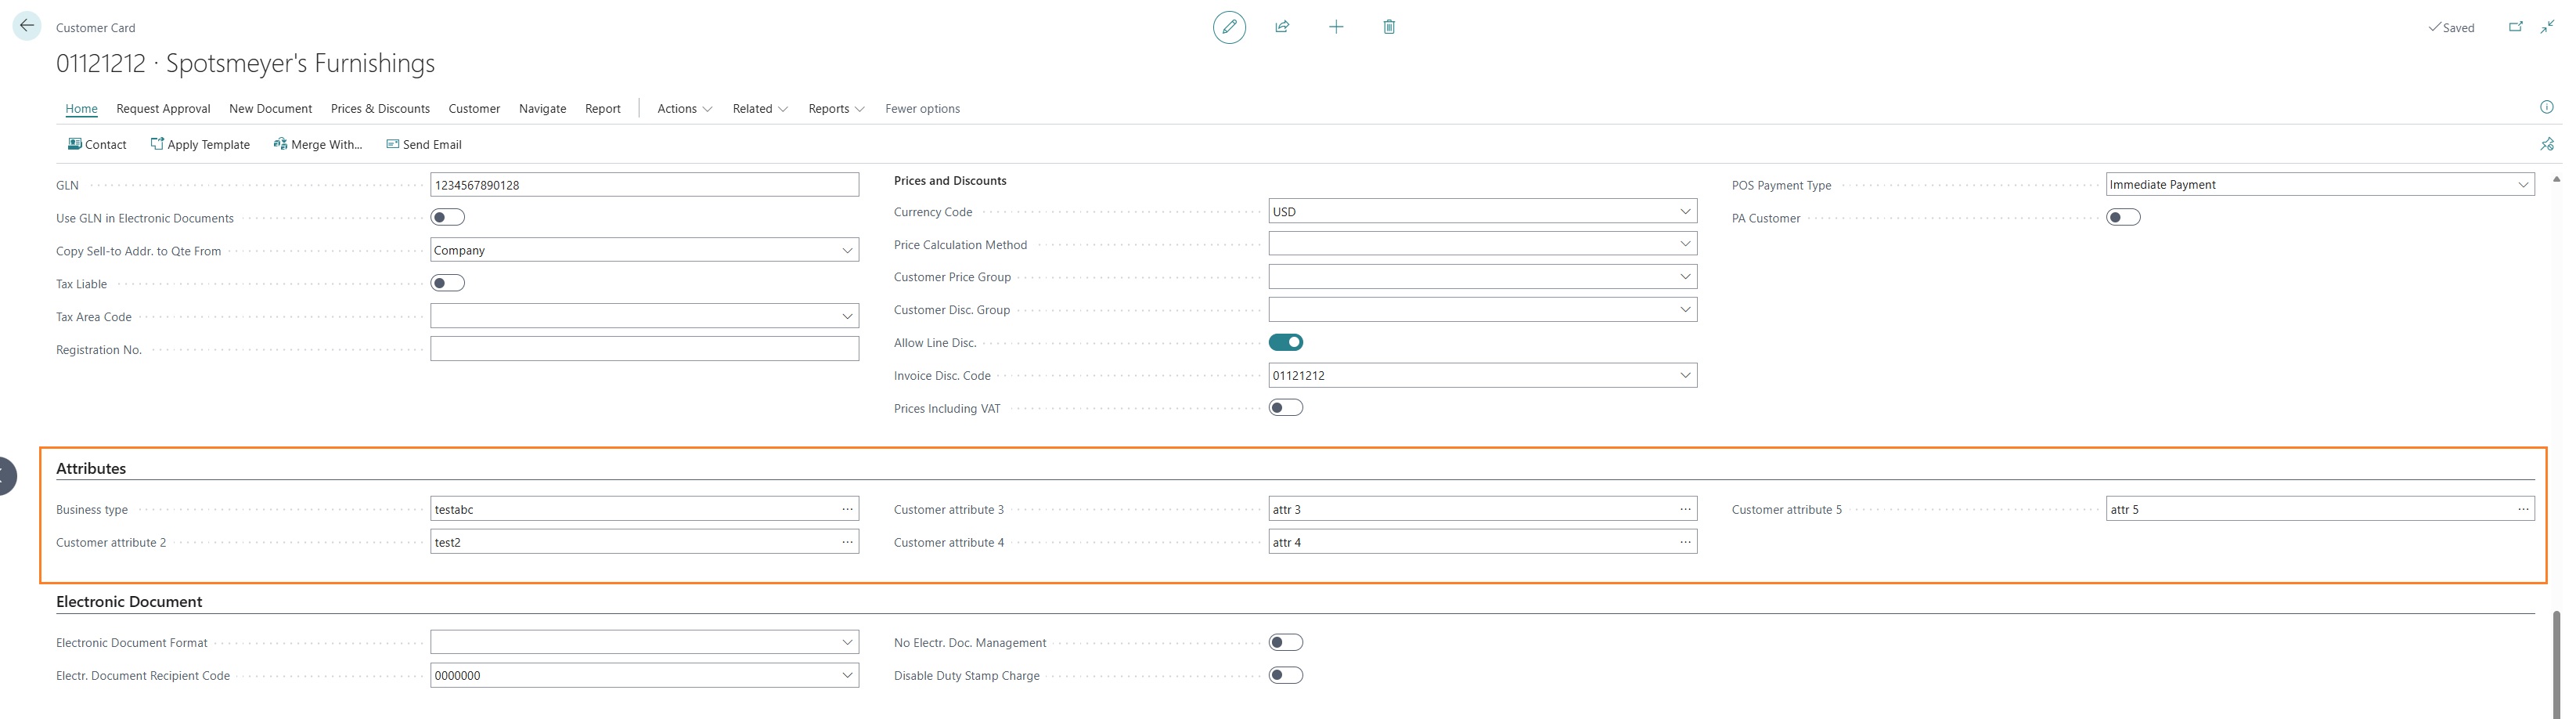
Attributi cliente
It is possible to define up to 5 “hard” attributes linked to the customer master data. These attributes can be viewed, populated, and filtered just like any other field within the customer card.
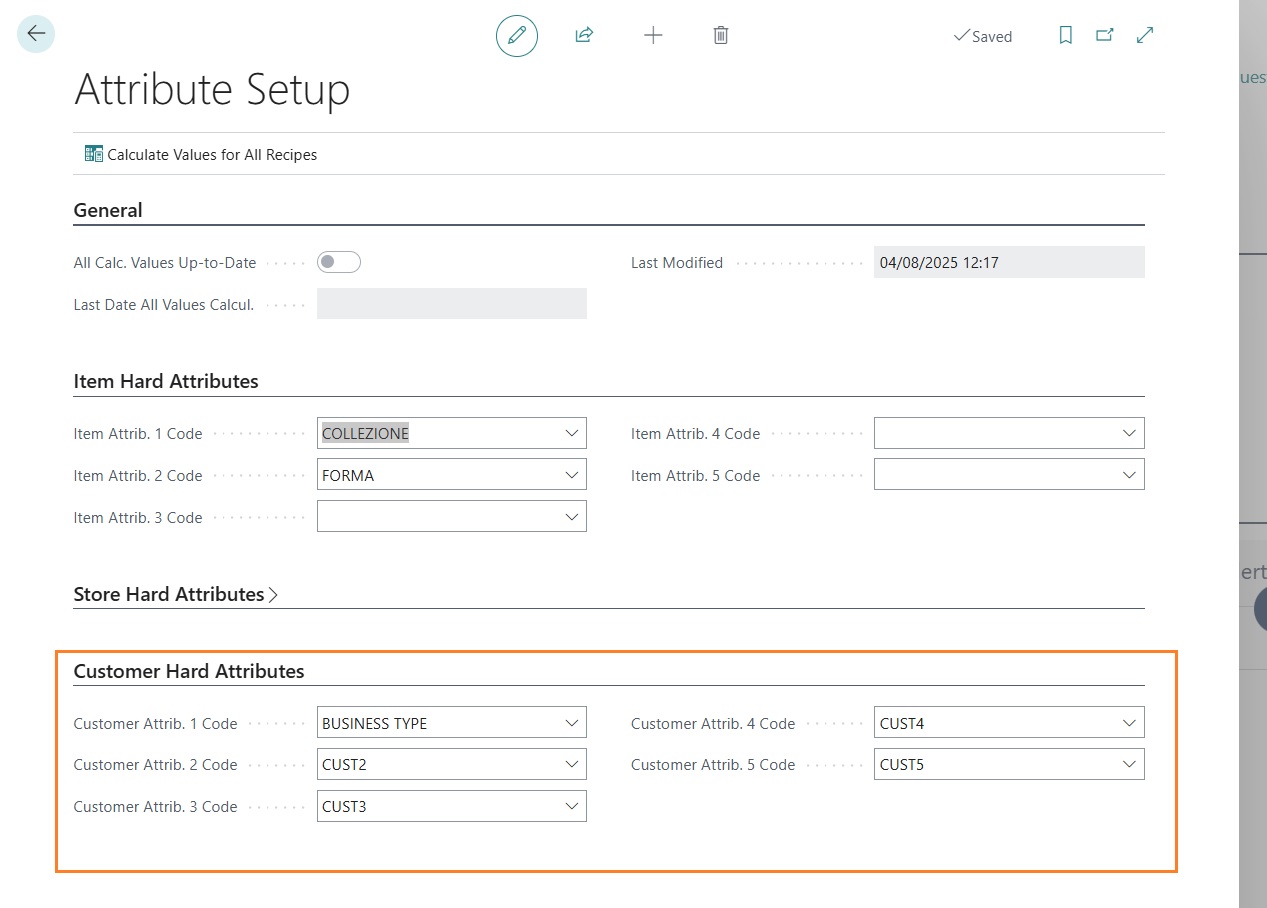
After defining the “hard” attributes, once Business Central is reopened, the defined fields will be directly visible in the customer master data card.
Metodi di pagamento
Tender Types
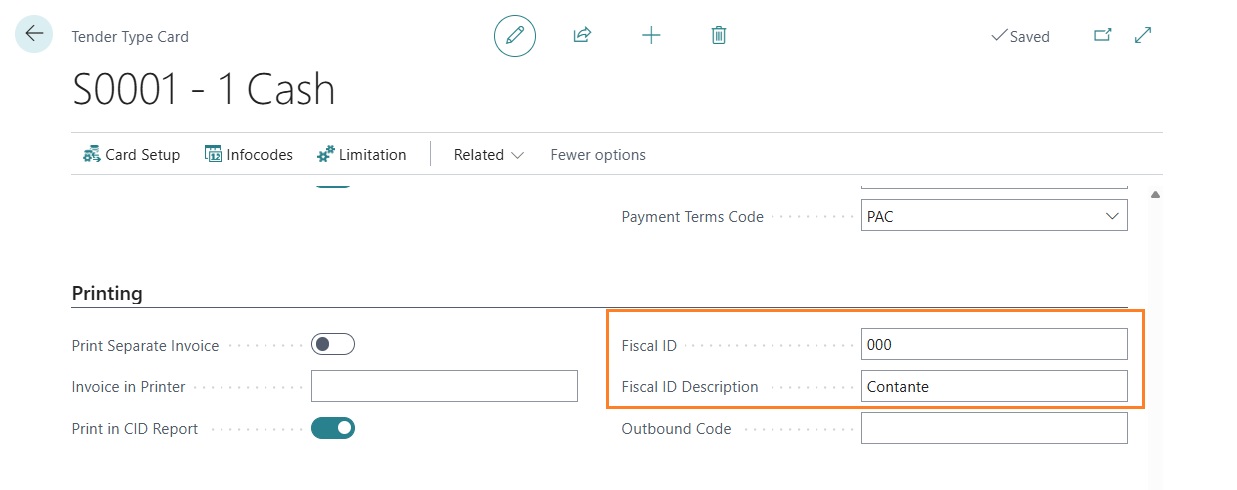
For the purpose of issuing a sales document, return, or cancellation through an Epson fiscal printer, it is necessary to define, for each payment method (tender type) available in the store, the corresponding payment category as required by the Italian Revenue Agency. The various definable categories and their specifications are provided by the Italian Revenue Agency. Below is a table listing the accepted categories:

In Business Central, within the master data of each payment method linked to each individual store, it is possible to define:
- “Fiscal ID”: according to the table provided above
- “Fiscal ID Description”: the description to be printed on the sales document
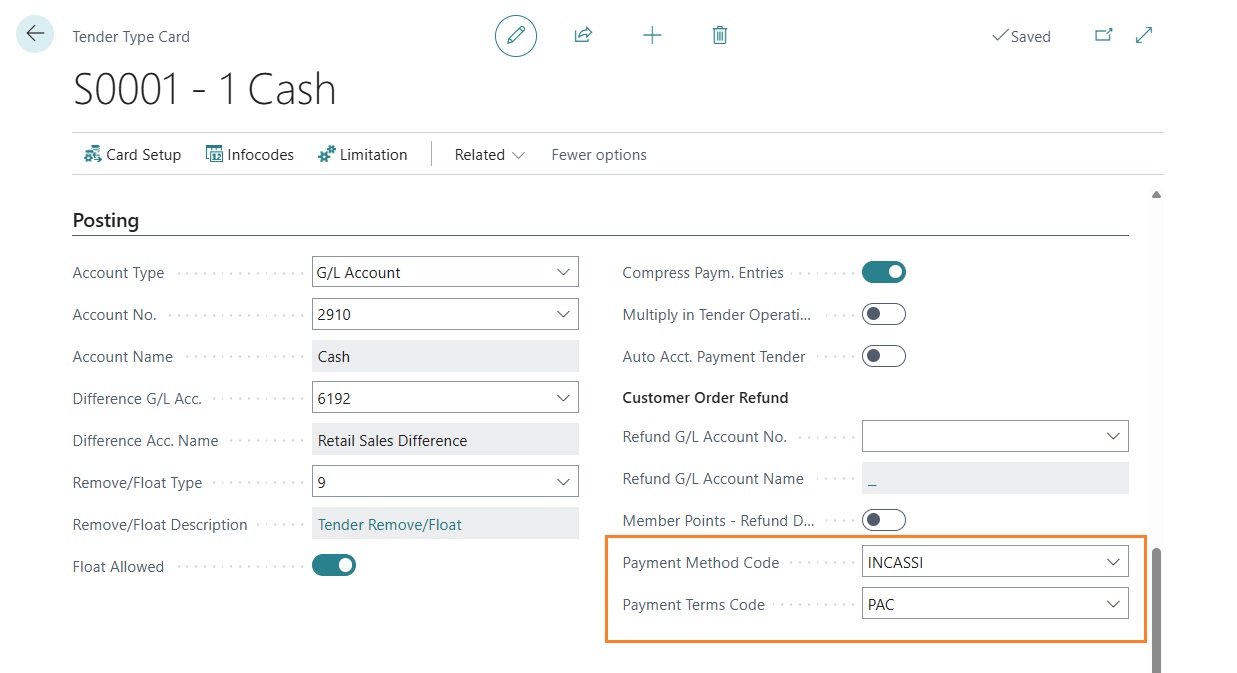
In case you want to allow the posting of sales invoices directly from the POS, it is necessary to populate additional fields that link the store payment method with a Business Central payment method and a payment term. These two fields are used during the creation and posting of the sales invoice starting from the sales transaction recorded in LS Central.
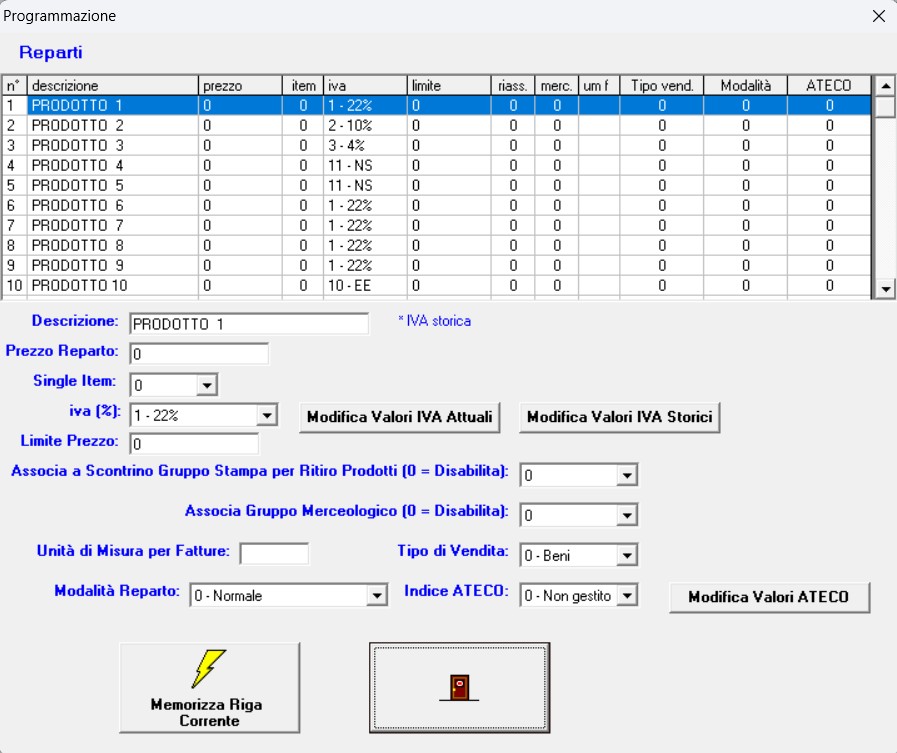
Setup IVA
VAT Setup
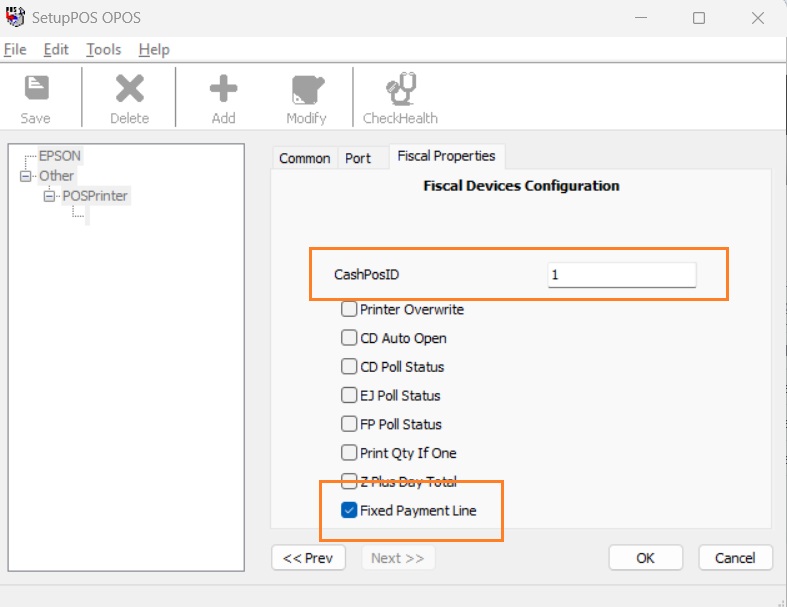
For the purpose of issuing a sales, return, or cancellation receipt, it is necessary to define a mapping between the POS VAT codes in LS Central and the fiscal departments configured in the setup of the Epson fiscal printer. The setup is unique across the entire system and is not dependent on the store or POS terminal; therefore, it is mandatory to configure all fiscal printers with the same VAT departments.
In the setup of the “POS VAT Codes”, all the parameters that can be configured directly in the fiscal printer department setup have been added. The only mandatory field is the “Fiscal ID” field, where the VAT department number corresponding to the LS Central VAT code must be entered.

Therefore, in the “Fiscal ID” field, enter the number of the corresponding department as defined in the fiscal printer setup.
Ruoli dispositivo
Device Roles
To correctly route the printing of fiscal documents versus management documents, it is necessary to define at least one Device Role of type Fiscal. In the definition of Device Roles in LS Central, create a record with Type = Serial, Role = SALES, and the Fiscal Printer field populated. In addition, to take advantage of further functionalities related to the printing of fiscal and management documents, it is necessary to define additional records; these records will control the printing of fiscal or management documents.i:

The record with Type “Serial”, Role “SALES”, and Fiscal Printer enabled will allow the printing of a fiscal document (sales, return, or cancellation). The record with Type “Serial”, Role “SALES”, Subrole “INCEXP”, and Fiscal Printer enabled will allow the printing of a fiscal sales document in the case of gift card sales as income/expense. The record with Type “Printer”, Role “SALES”, and Subrole “COPY” will allow the printing of a copy of a fiscal sales document. The record with Type “Printer”, Role “SALES”, and Fiscal Printer not enabled will allow the printing of management documents derived from sales transactions with other income/expenses, such as store expenses or other cash inflows not originating from sales.
Setup hardware profile
POS Devices
The hardware profile setup is essential for the correct issuance of fiscal sales documents or management documents. Before creating a specific hardware profile, the following POS devices must be created:
- POS Printer
- POS Line Display
- POS Drawer
- Serial Device
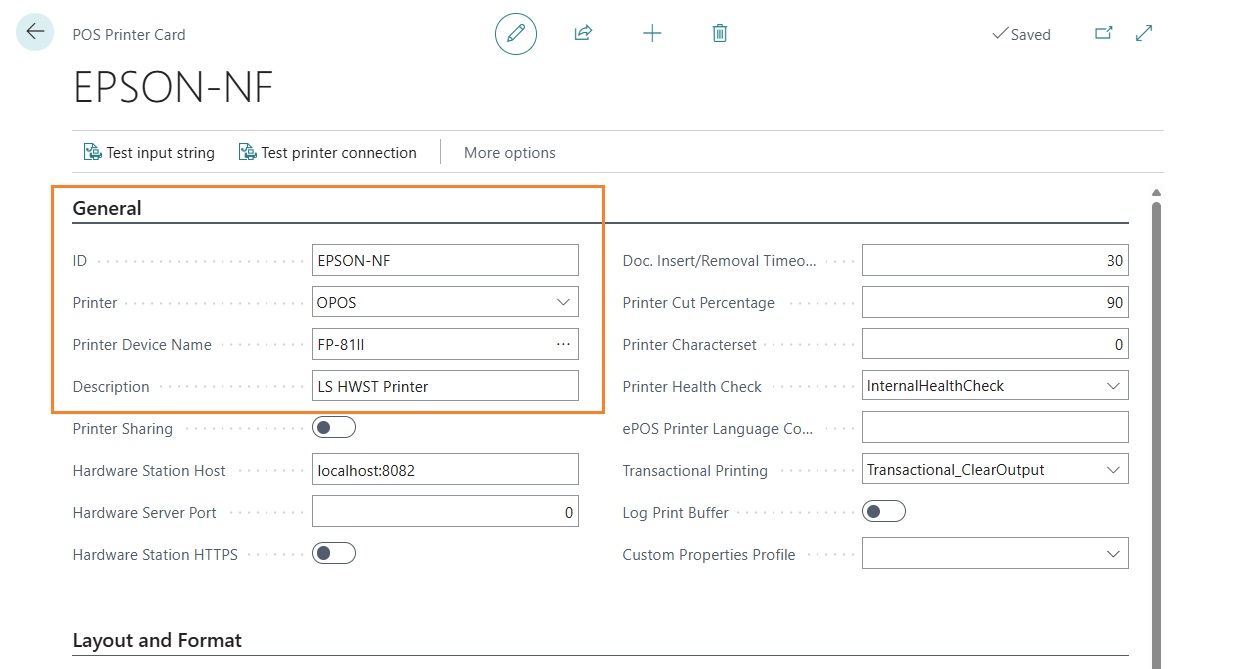
POS Printer
The POS printer setup, which enables the printing of management documents from the fiscal printer, requires the definition of:
- ID = the printer ID as defined in the Hardware Station setup
- Printer = OPOS
- Printer Device Name = the name of the device as defined in the Hardware Station setup
- Description = an optional description you may want to assign to the printer
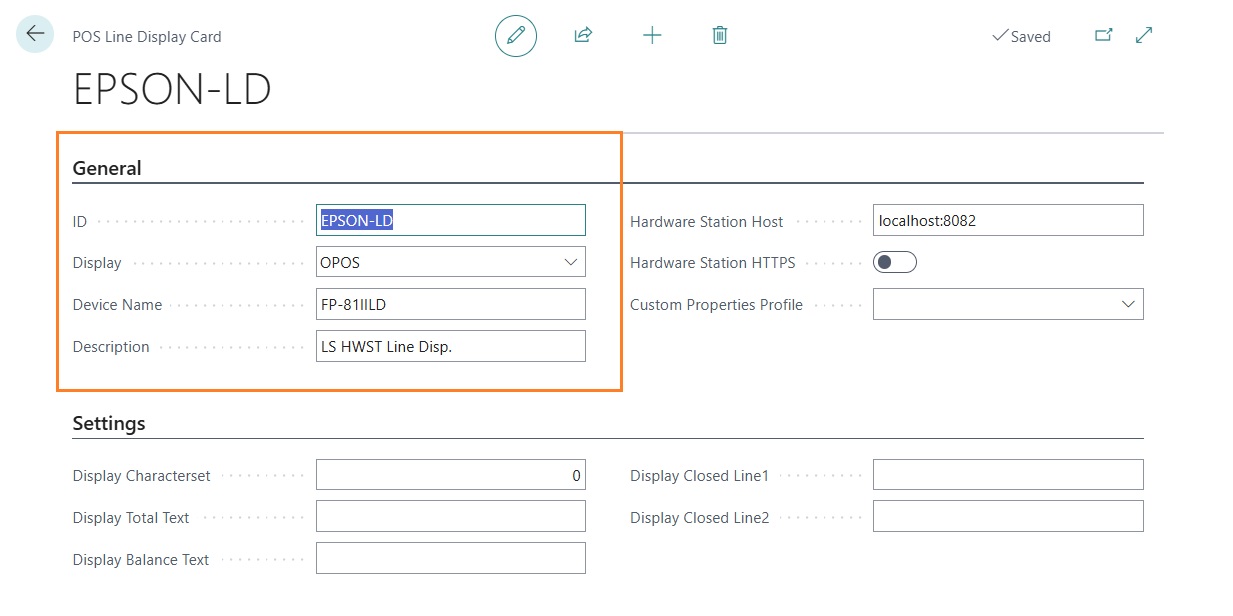
Line Display
The POS line display setup (also referred to as customer-facing display) allows the display of various information on the screen connected to the fiscal printer. The setup requires the definition of:
- ID = the line display ID as defined in the Hardware Station setup
- Display = OPOS
- Device Name = the name of the device as defined in the Hardware Station setup
- Description = an optional description you may want to assign to the display
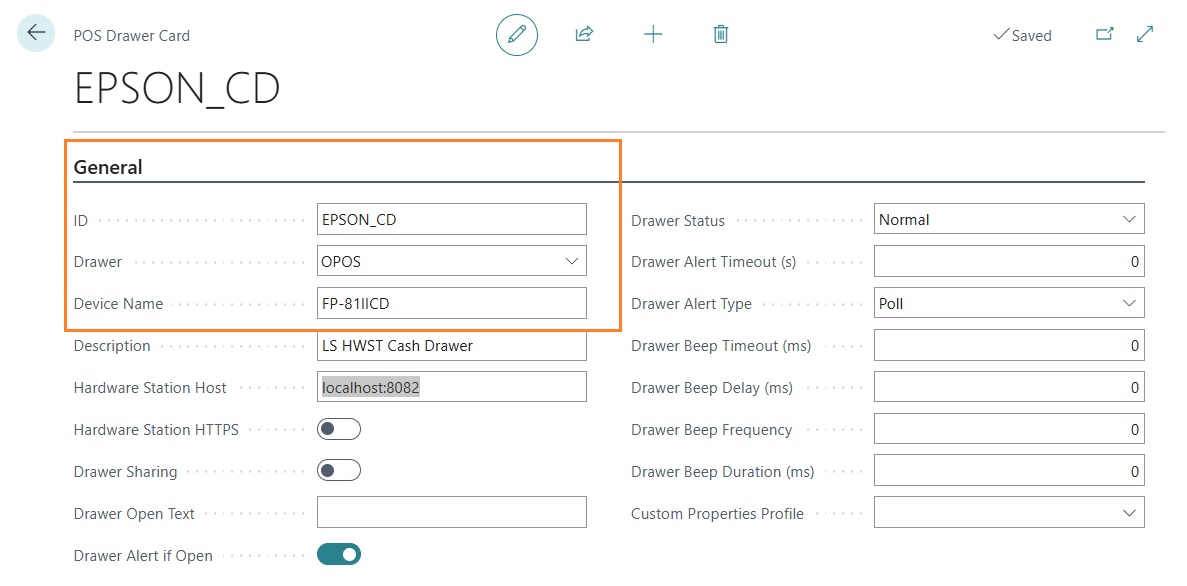
Cash Drawer
The POS drawer setup (also referred to as Cash Drawer or Fiscal Drawer) enables the automatic opening of the fiscal drawer for all operations where it is required, such as at the end of a sale or during the end-of-day closing. Without defining a POS drawer, the drawer would have to be opened manually by the user.
The setup requires the definition of:
- ID = the ID of the drawer as defined in the Hardware Station setup
- Drawer = OPOS
- Device Name = the name of the device as defined in the Hardware Station setup
- Description = an optional description you may want to assign to the drawer
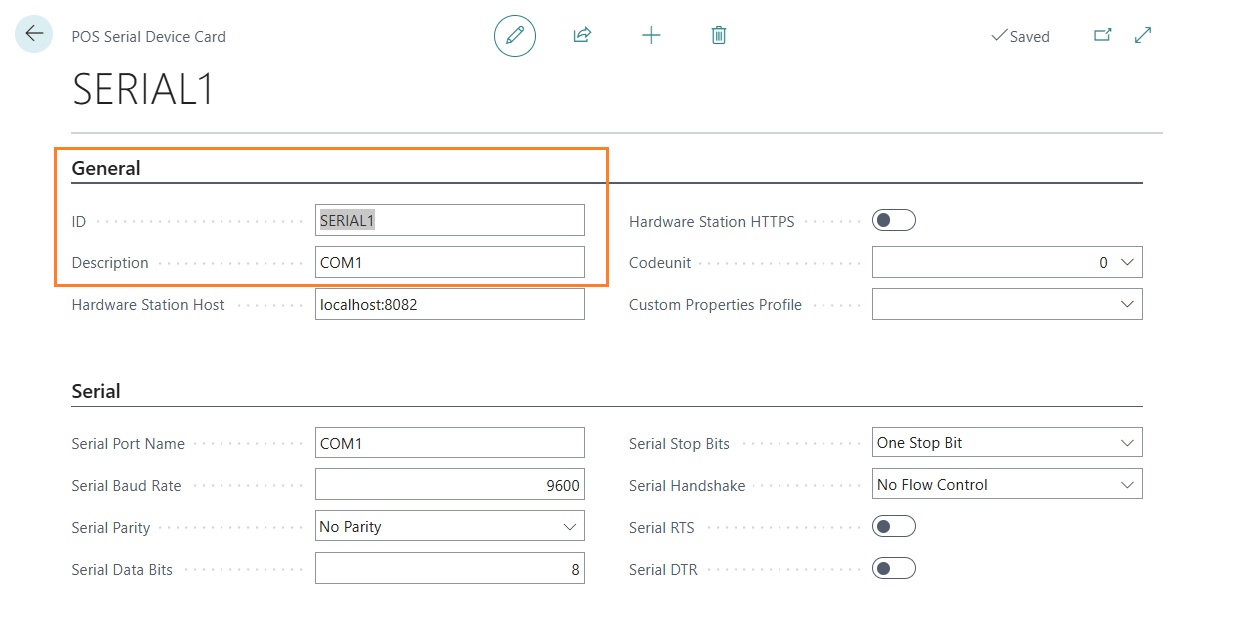
Serial Device
The serial device setup allows the printing of fiscal sales documents, returns, or cancellations. Integration with Epson fiscal printers is managed and therefore configured as a serial device for the Hardware Station. The setup requires the definition of:
- ID = the serial device ID as defined in the Hardware Station setup. In this case, it is mandatory to enter SERIAL1.
- Description = an optional description you may want to assign to the serial device
Hardware station setup
It is possible to semi-automatically insert some of the setups related to devices and the hardware profile. After completing all the steps on the “Hardware Station Setup” page, in the hardware profile card, run the “Synchronize Hardware Profile” function.
If you prefer to enter the setups manually, you will need to add one or more detail lines in the hardware profile card, depending on the devices you want to manage.
For a minimal setup required for the fiscal printer to function, you need to insert:
- One or more records in the “POS Printers” section

- One record in the “POS Drawers” section

- One record in the “POS Line Displays” section

- One record in the “POS Serial Devices” section

Hardware station
Software & hardware station
For communication with the Epson fiscal printer, some software and setups are required that are not strictly related to Business Central.
Required software
The software required to use the fiscal printer and other connected devices includes:
- LS Hardware Station
- OPOS CCO (Common Control Objects)
- Epson FPSuite: it is recommended not to install FPMate
- EpsonOPOSForFiscalSetup
- POSforDotNet
After installing the software listed above, specific DLLs must be used for the integration between LS Hardware Station and Epson fiscal printers. For correct management of fiscal sales documents and management documents, a specific registry key must also be added.
Setup of communication with the fiscal printer
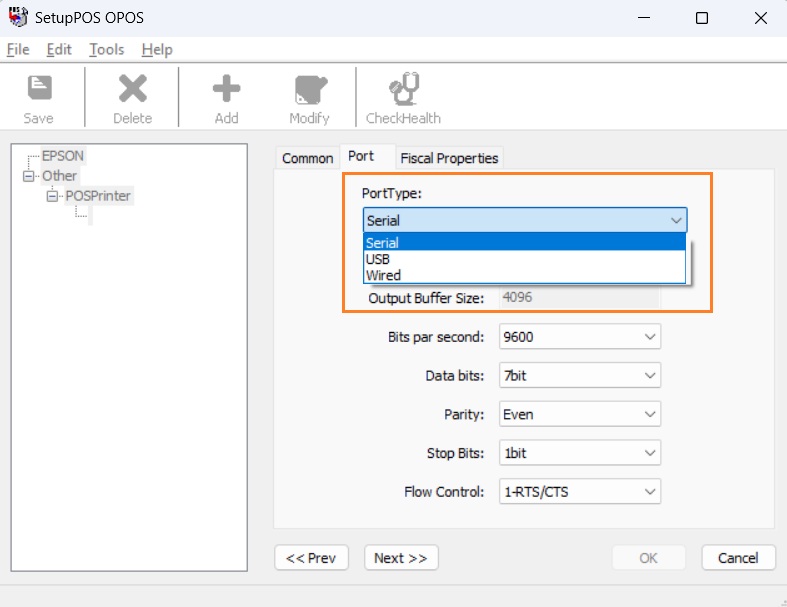
The communication between the PC acting as the POS and the fiscal printer can occur via three connection types:
- USB
- Ethernet
- Serial
To set up the connection correctly, follow these steps:
- Activate the chosen connection mode directly on the fiscal printer (refer to the operator manual or contact the fiscal printer installer).
- Stop the LS Hardware Station service if it is running.
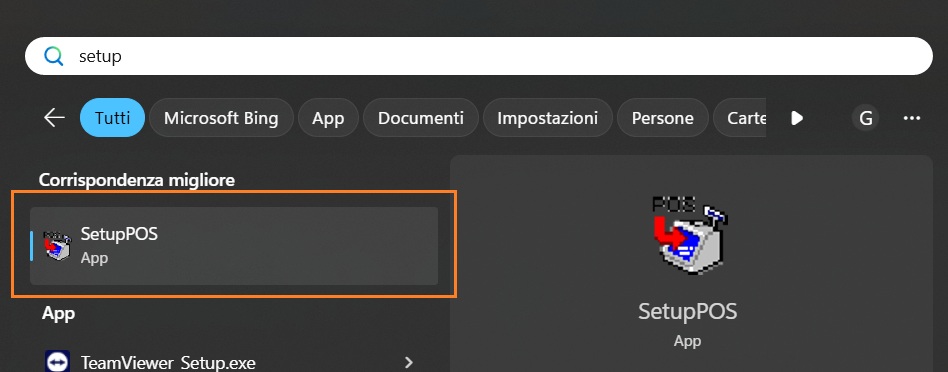
- Run the “Setup POS” program.
Once the program is open, use the “Add” function to add the devices. All required devices must be added:
- FiscalPrinter
- LineDisplay
- CashDrawer
For each type of device, define the following setup:
- Logical Device Name
- Device Category
- Device Name
- Port Type
- Indirizzo della porta USB, Seriale o indirizzo IP del dispositivo
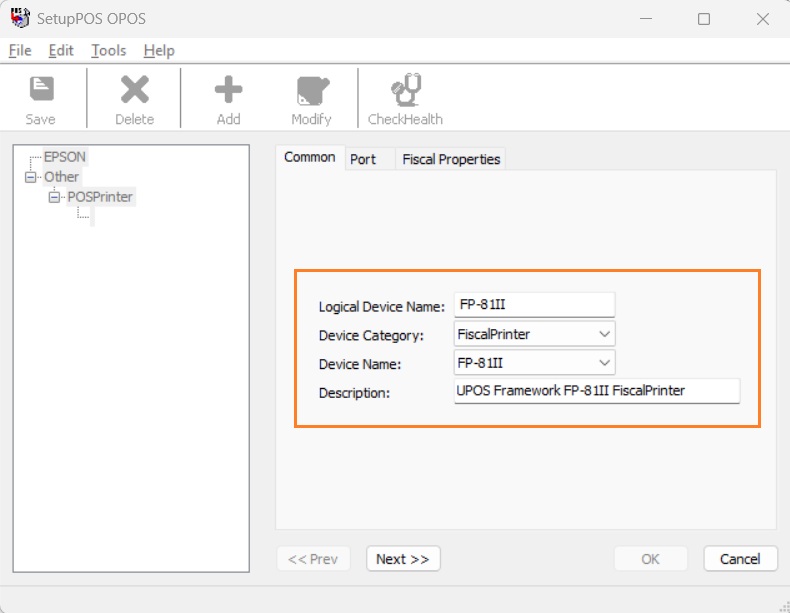
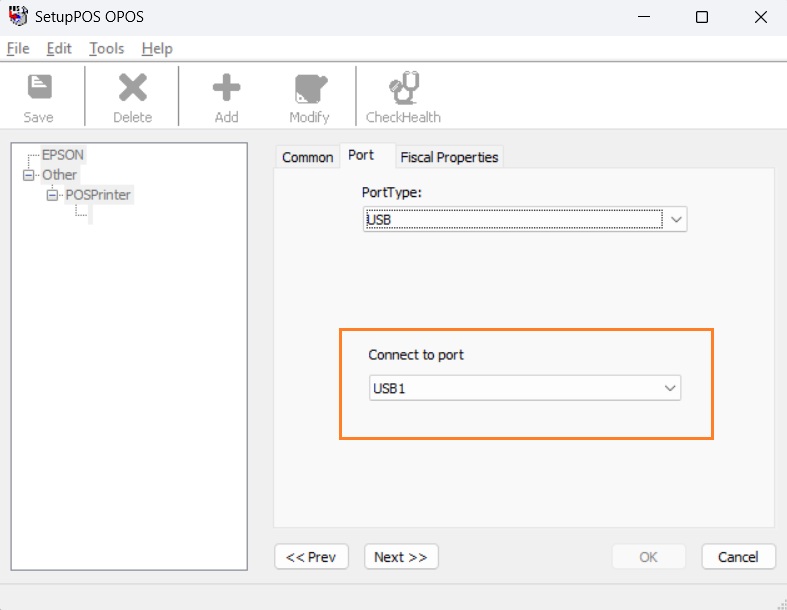
After entering the device communication configuration, press “Save”.
The same procedure must be followed for other connected devices, such as the customer-facing display and the cash drawer.
For the cash drawer and line display, no setup in the “Fiscal Properties” section is required.
Register key
To manage the printing of fiscal and management documents on a single fiscal printer, a specific registry key must be added.
The registry key to be added is:
Windows Registry Editor Version 5.00
[HKEY_LOCAL_MACHINE\SOFTWARE\WOW6432Node\OLEforRetail\ServiceOPOS\POSPrinter] @=””
[HKEY_LOCAL_MACHINE\SOFTWARE\WOW6432Node\OLEforRetail\ServiceOPOS\POSPrinter\FP-81II] @="SOEPSON.FiscalPrinterService.1130” “DriverName"="EPSON UPOS FiscalDriver” “InstallFolderPath"="C:\Program Files (x86)\EPSON\UPOSDriverForFiscal\OPOS”
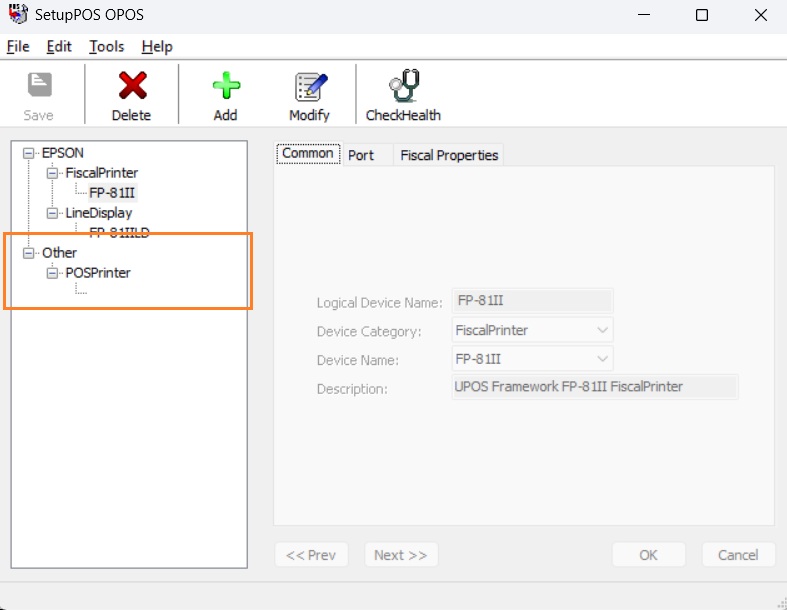
Once the registry key is entered, a new device named “POS Printer” will appear in the “Other section of the “Setup POS” program.
Ulteriori verifiche e configurazioni
Check the installed .NET Framework version via the registry key Computer\HKEY_LOCAL_MACHINE\SOFTWARE\Microsoft\NET Framework Setup\NDP\v4\Full
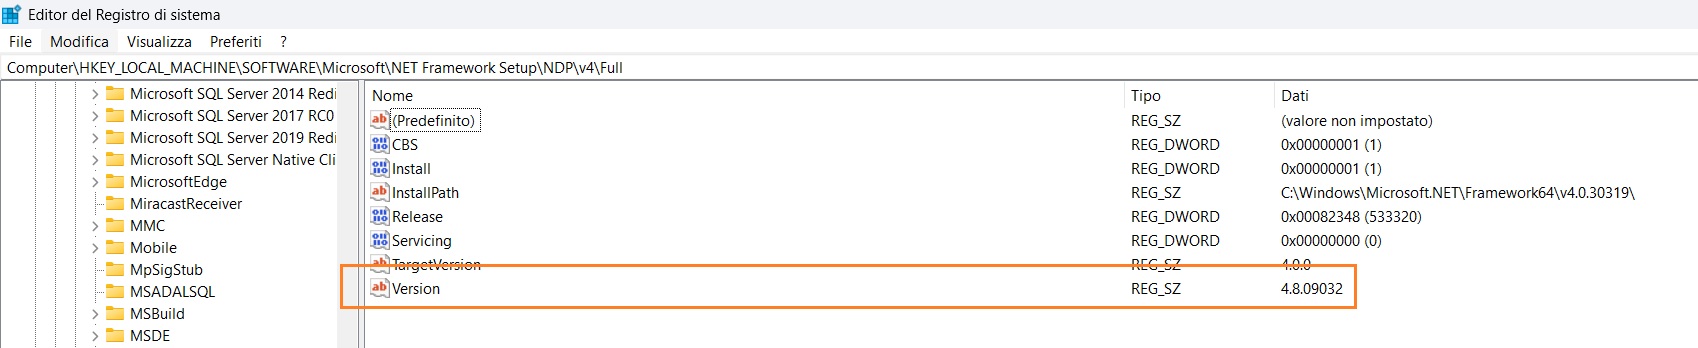
If the version is earlier than 6.02, a more recent version must be installed, which can be downloaded online. If necessary, install and activate the downloaded .NET Framework. Activation of the .NET Framework must be completed via:
- Control Panel → All Control Panel Items → Programs and Features
- Turn Windows features on or off
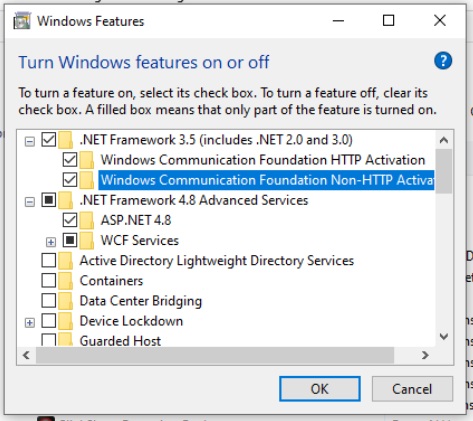
Note: The screenshot shown may differ from the POS PC (language and installed components).
DLL Install
The communication between LS Hardware Station and the Epson fiscal printer is managed via specific DLLs. The DLLs, provided by EOS, must be copied to the Hardware Station installation folder at:
In the folder C:\Program Files (x86)\LS Retail\LSHardwareStation\Devices\OPOS, copy the files:
- LSOposSerialDevice.dll
- LSOPOSFiscalPrinter.dll
In the folder C:\Program Files (x86)\LS Retail\LSHardwareStation\bin\LSHardwareStation, copy the files:
- Interop.OposFiscalPrinter_CCO.dll
- LSOposControls.dll
After copying the files, start the Windows service LS Hardware Station.
Hardware station configuration
Open the configuration panel in a browser at http://localhost:8088/. Enter your login credentials to access the management panel.
Add the previously configured devices:
- Printers -> Non-fiscal printers (required for management document printing)
- Line display -> Customer-facing display
- Cash Drawer -> Cash drawer
- Serial Devices -> Fiscal printer
Non-fiscal printer setup
To add or modify a device configuration, select the type Printers and press “Create Printer”.
Enter the parameters as specified:
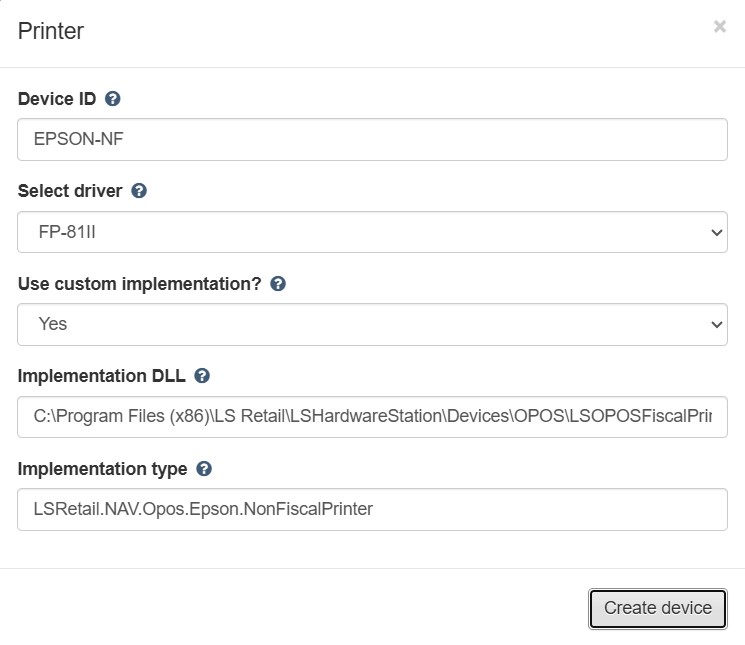
For Implementation DLL, enter:
C:\Program Files (x86)\LS Retail\LSHardwareStation\Devices\OPOS\LSOPOSFiscalPrinter.dll
For Implementation Type, enter:
LSRetail.NAV.Opos.Epson.NonFiscalPrinter
Press “Create Device”.
Select Printers → EPSON-NF to reopen the configuration, press Load, and verify that no errors are present. If errors occur, restart the LS Hardware Station service and try again.
Line Display setup
To add or modify a line display, select “Line Displays” and press “Create Line Display”
Enter the parameters as specified:
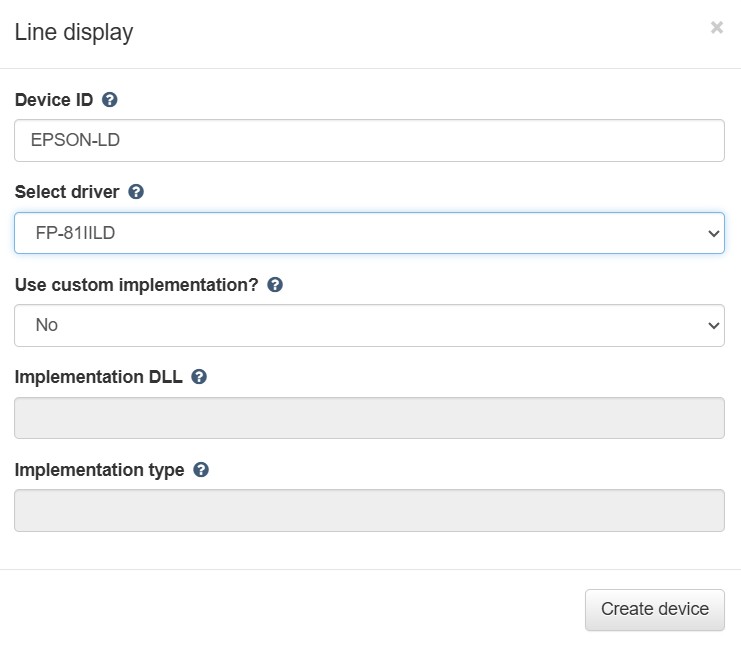
Press “Create Device”.
Select “Line Displays” and “EPSON-LD” to reopen the configuration, press Load, and verify that no errors are present. If errors occur, restart the LS Hardware Station service and try again.
Cash Drawer setup
To add or modify a cash drawer, select “Cash Drawer” and press “Create Drawer”. Enter the parameters as specified:
Press “Create Device”. Select “Cash Drawer” and “EPSON-CD” to reopen the configuration, press Load, and verify that no errors are present. If errors occur, restart the LS Hardware Station service and try again.
Creazione serial device
To add or modify fiscal printer, select “Serial Device” and press “Create Serial Device”.
Enter the parameters as specified:
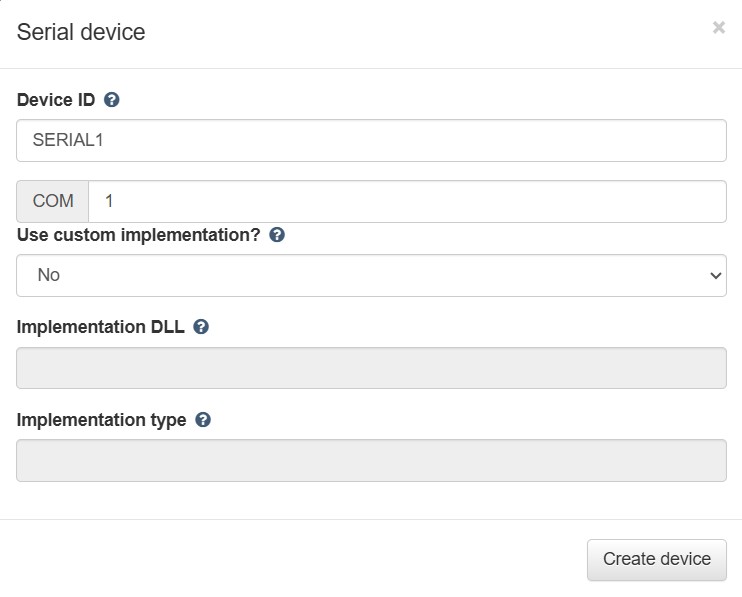
Press “Create device”.
Select “Serial Devices” and “SERIAL1” to reopen the configuration, press Load, and verify that no errors are present. If errors occur, restart the LS Hardware Station service and try again.
Restart Hardware Station service
Once the device configuration is complete, restart the LS Hardware Station service.
Functionality Profile
Functionality Profile
Within the Functionality Profile setup card, several sections and setup fields have been added.
Additional setups
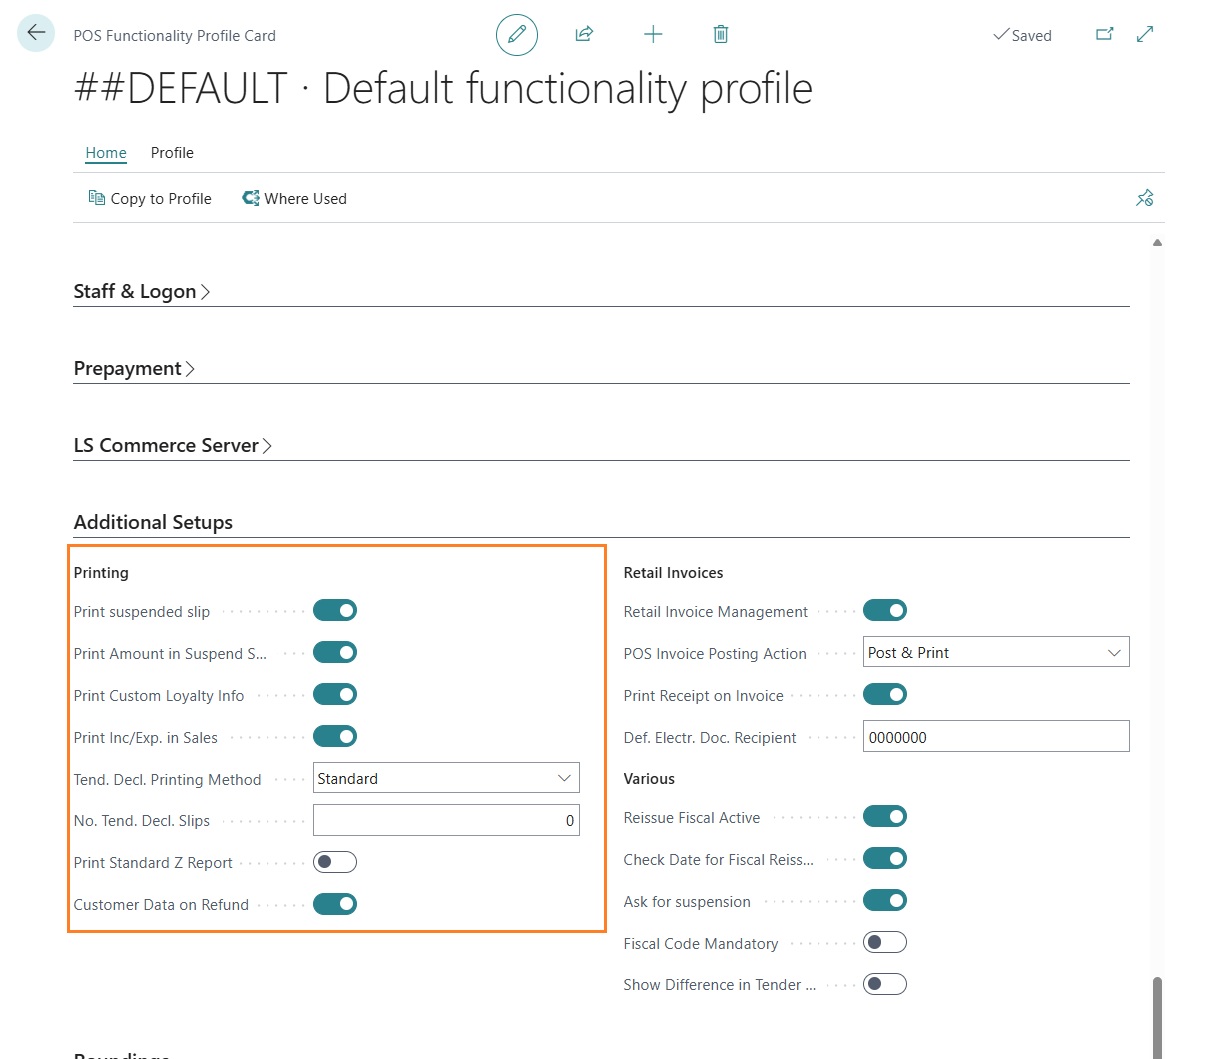
“Print suspended slip”: if enabled, when a user suspends a sales transaction on the POS, LS Central prints a management document with some information from the suspended transaction; if disabled, nothing is printed.
“Print amounts in suspended slip”: if enabled, the management document generated from a suspended transaction includes the transaction total; if disabled, no amounts are printed.
“Print custom loyalty info”: if enabled, information related to the member card and member associated with the sales transaction is printed. This includes the card number, any points used or accumulated, and the point balance.
“Print inc/exp. in sales”: if enabled, it allows printing of sales transaction lines of type income/expense. This setup must be enabled if gift card sales (or, more generally, voucher sales) are handled via income/expense accounts instead of items.
“Tend. decl. printing method”: this field can take two values:
- Standard: the number of tender declaration management documents printed follows the LS Central standard.
- Custom: the number of tender declaration management documents to print can be defined in the field “No. Tend. Decl. Slips”.
“Print standard Z Report”: if enabled, in addition to the fiscal Z Report issued by the fiscal printer, a Z Report with the LS Central layout is printed.
“Customer data on refund”: if enabled, the commercial refund document will include blank spaces where the following can be filled in:
- Customer name and surname
- Customer signature
- Staff signature who performed the return
Retail invoices
The setups in the Retail Invoices section relate to creating sales invoices and credit notes directly from POS transactions. The app also allows invoice or credit note creation directly from a transaction card in Business Central.
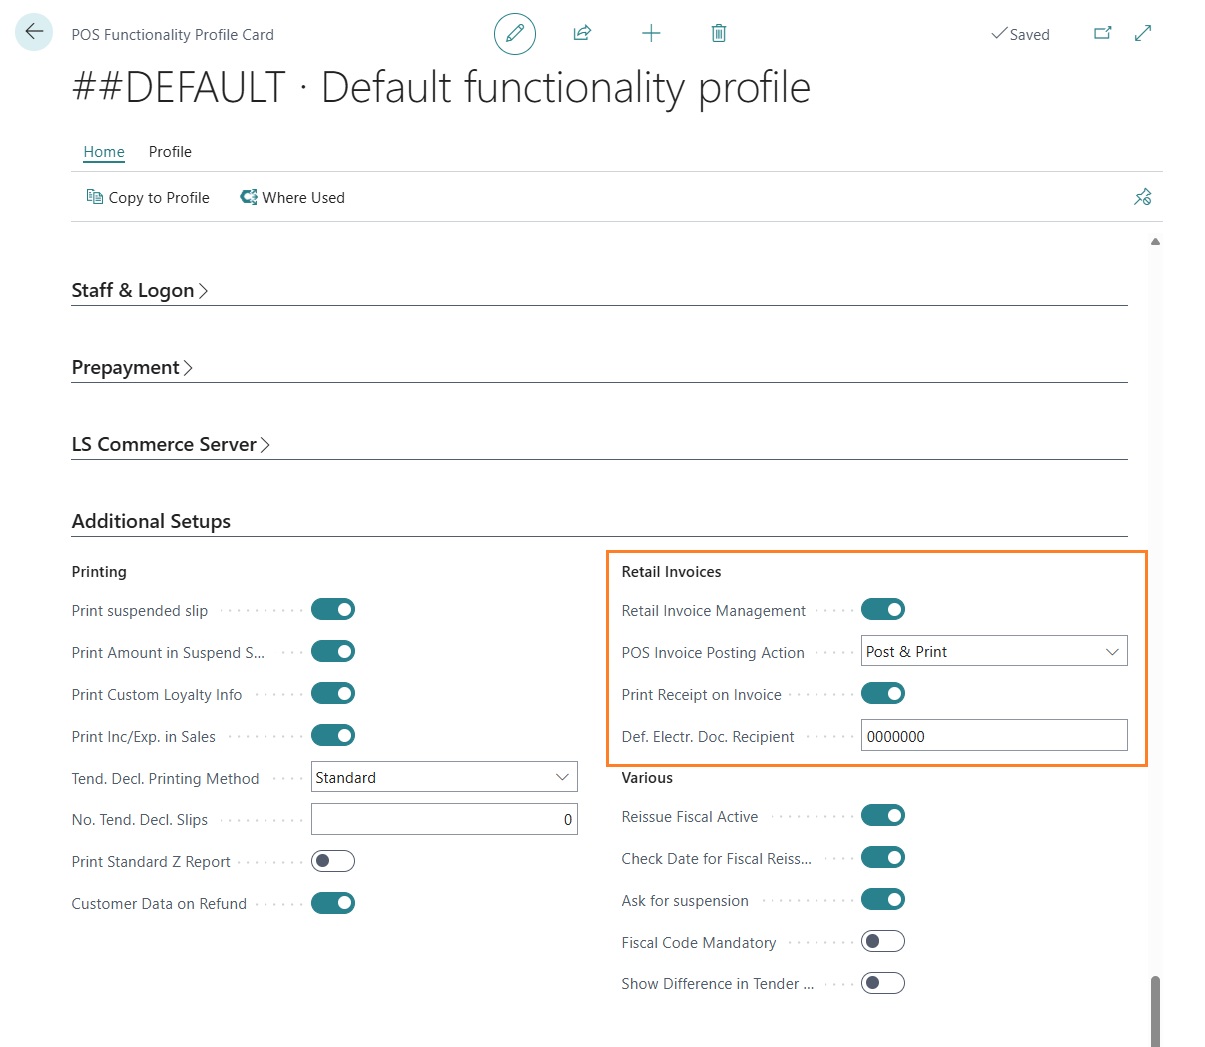
- “Retail invoice management”: if enabled, it is possible to create invoices or credit notes directly from the POS.
- “POS invoice posting action”: this field can take three values:
- “Post & Print”: after posting an invoice or credit note, the document is printed.
- “Post & E-Mail”: after posting, the document is sent via email.
- “Post”: only posting is executed, no print or email. “Print receipt with invoice”: if enabled, when registering an invoice or credit note from the POS based on a sales transaction, the fiscal sales or return document is also printed; otherwise, only the invoice or credit note is posted. “Def. Electr. Doc. Recipient”: when creating a new customer from the POS, if this field is populated, it will be proposed as the default SDI code for the customer master data.
Various
Setups in the “Various” section are related to micro-functionalities and system usability rather than major processes:
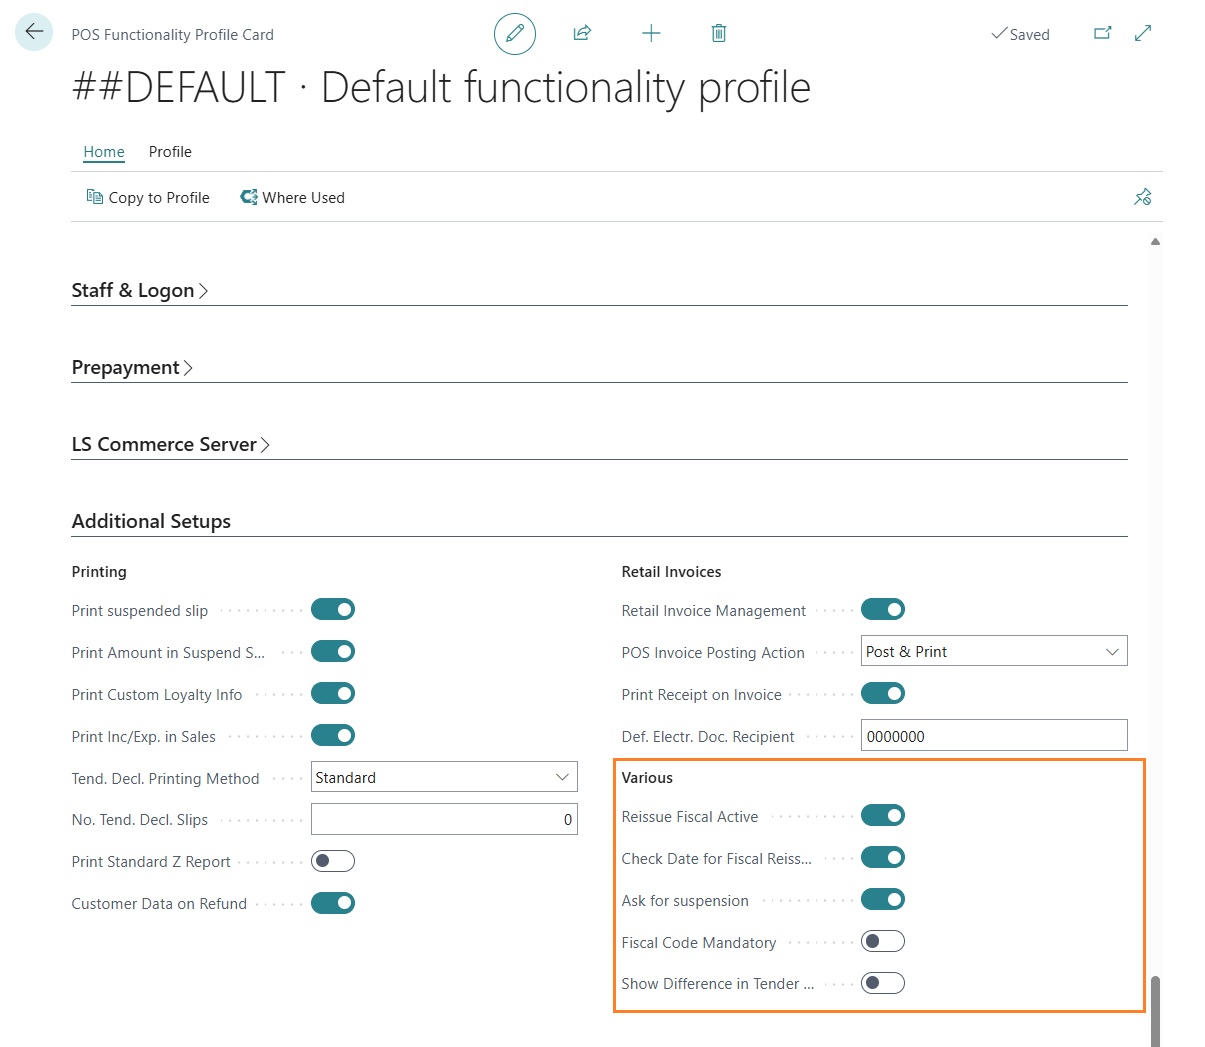
“Reissue Fiscal Active”: if enabled, it is possible to reissue a previously posted sales transaction fiscally.
“Check date for fiscal reissue”: if enabled, fiscal reissue is allowed only for transactions of the same day.
“Ask for suspension”: if enabled, the user is prompted for confirmation when suspending a sales transaction.
“Fiscal code mandatory”: if enabled, when creating a new customer from POS, entering the tax code is mandatory.
“Show Differnce in Tender Delcaration”: if enabled, the tender declaration screen will show any difference between the amount calculated by LS Central and the amount counted by the staff.
POS Command
POS Command
For full use of the app, it is necessary to register some POS external commands.
From the “POS External Commands” list, execute the “Register” function:
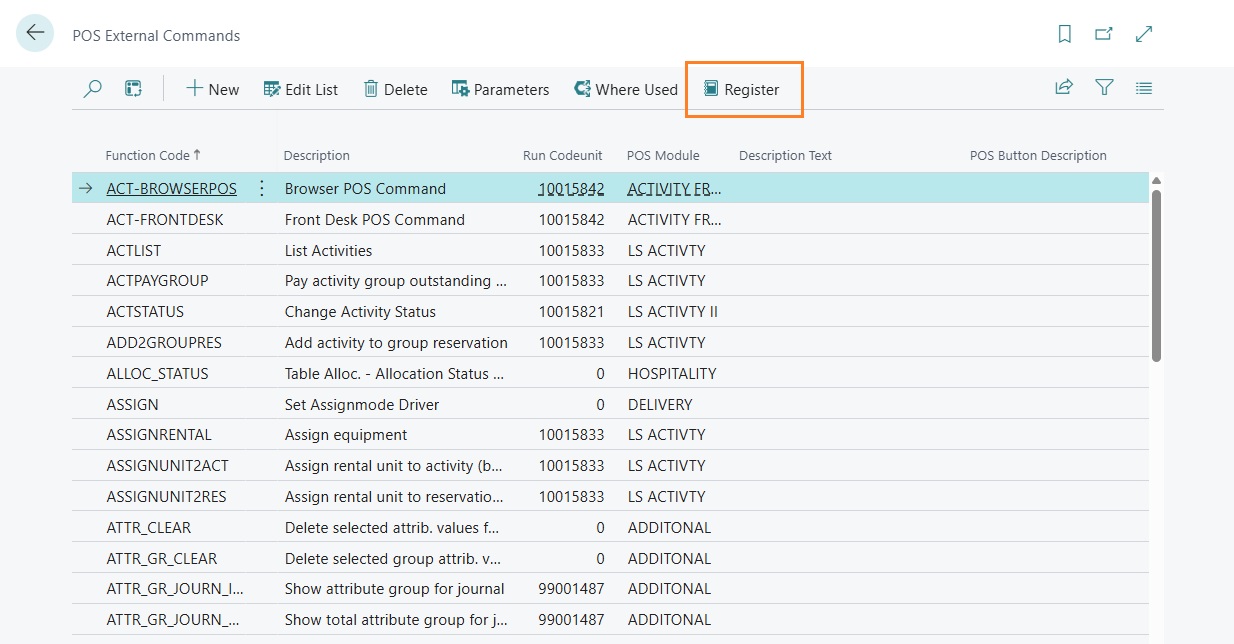
Register the following codeunits:
- 18091484 “EOS077 Customer Command”
- 18091488 “EOS077 Expense POS Command”
- 18091489 “EOS077 External POS Command”
- 18091499 “EOS077 Invoice Mgmt.Command”
- 18091515 “EOS077 POS Lottery Management”
After completing the registration, all external commands related to the listed codeunits must appear in the list.
Setup Retail
Retail Setup
Within the LS Central retail setup, some new sections and setup fields have been added.
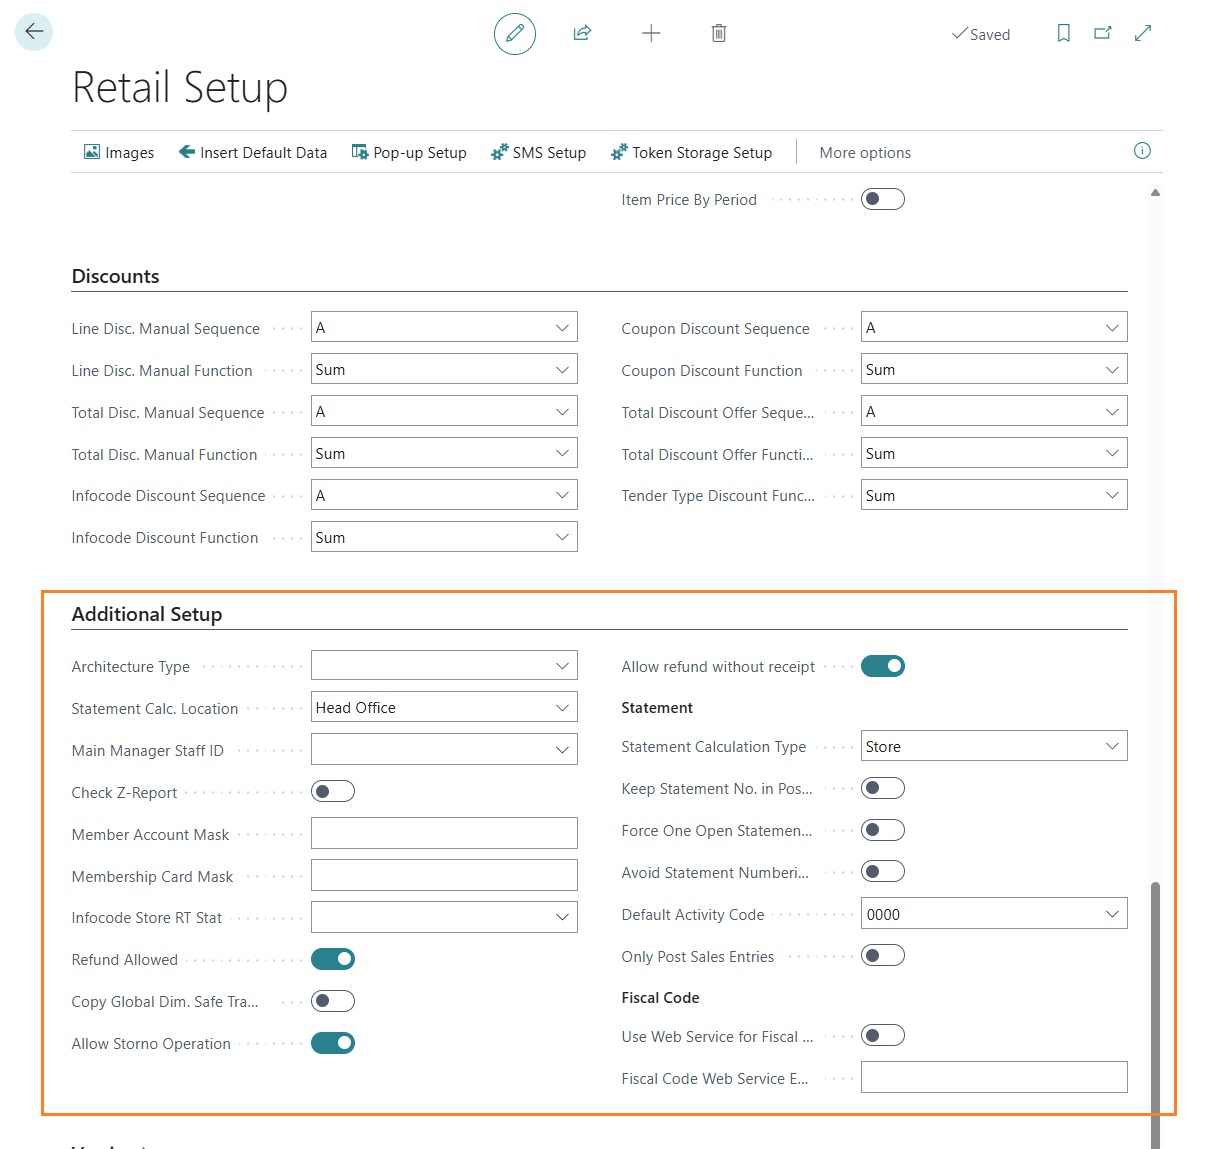
Architecture Type: the field can take two distinct values:
- Offline: used when the architecture is hybrid or OnPrem and stores have their own Business Central instance separate from the head office.
- Online: used when the whole system is SaaS (both stores and head office). This field controls how retail invoices and credit memos are managed, and where they are created and posted. “Statement calc. location”: the field can take two distinct values:
- “Head Office”: the statement calculation for the store is executed in head office.
- “Store”: the statement calculation is executed locally in the store, and then replicated to head office for posting.
“Main Staff Manager ID”: during the guided procedure for creating a new store, indicates the staff ID to be considered as the store manager and therefore copied from the template store.
“Check Z Report”: if enabled, during settlement calculation the system verifies that all transactions to be included are part of a Z Report. If some transactions are missing from a Z Report, the settlement calculation stops with a specific error.
“Member Account Mask & Member Card Mask”: define the “mask” of characters used to recognize a member in the POS via their member card or member number directly in the input field for barcodes or item codes.
“Return Allowed”: if enabled, POS users can process returns and issue a commercial return document. If disabled, only cancellation operations are allowed, resulting in a commercial cancellation document.
“Copy Global Dimensions in Safe Transfer”: when creating a safe transfer, the store’s Global Dimension 1 and 2 are copied to the transfer document.
“Allow storno operation”: allows the insertion and management, via POS, of negative value/quantity transaction lines. If disabled, the system requires entry of the original commercial document details (document number, issue date, and fiscal printer serial number) for returns or cancellations.
“Allow refund without receipt: allows processing a return not linked to a registered transaction. The system will prompt for manual entry of the commercial document number, date, and fiscal printer serial number. These details can be retrieved from the printed receipt provided by the customer.
The Statement section contains setup fields related to the calculation and posting of daily store settlements.
- “Statement Calculation Type:": the field can take two distinct values:
- Store: settlement can only be calculated locally in a store. This option is only valid for OnPrem architectures; the settlement must then be replicated to head office for further processing. The field can take two distinct values:
- Head Office: settlement can only be calculated in head office.
- “Keep statement No. on Posting”: the system does not allow the creation of a new statement if there is already one open and not fully posted. This setup is only valid when the statement is calculated locally in the store.
- “Prevent statement numbering gaps”: the system does not allow the deletion of open statements in order to avoid the creation of empty posted statements.
- “Default Activity Code”: specifies the activity code the system must use when posting a statement.
- “Post only sales transactions”: allows only the posting of item ledger entries from a statement.
The “Fiscal Code” section contains some setup options required if you want to use an external service (web service) for fiscal code validation during the creation of a member contact.
- “Use web service for fiscal code”: enables the possibility to use an external service for validation and, if applicable, calculation of certain information based on the fiscal code. If not enabled, the information (age, gender, and place of birth) is calculated directly by the system.
- “Fiscal code web service endpoint”: allows you to define the endpoint of the service to be used for validating the entered fiscal code.
Negozio
Store setup
Within the store master data card, some additional fields have been added to define extra functionalities compared to the standard setup.
Electronic Invoicing
For the creation and posting of sales invoices and credit memos directly from the POS, it is necessary to define at least two sales document classes that include a default posting setup with posting type “Statistical Document” and item ledger entry generation “Do not create item entries”. These classes must then be specified in the store master data; it is therefore possible to define different classes, with different number series, for each individual store.
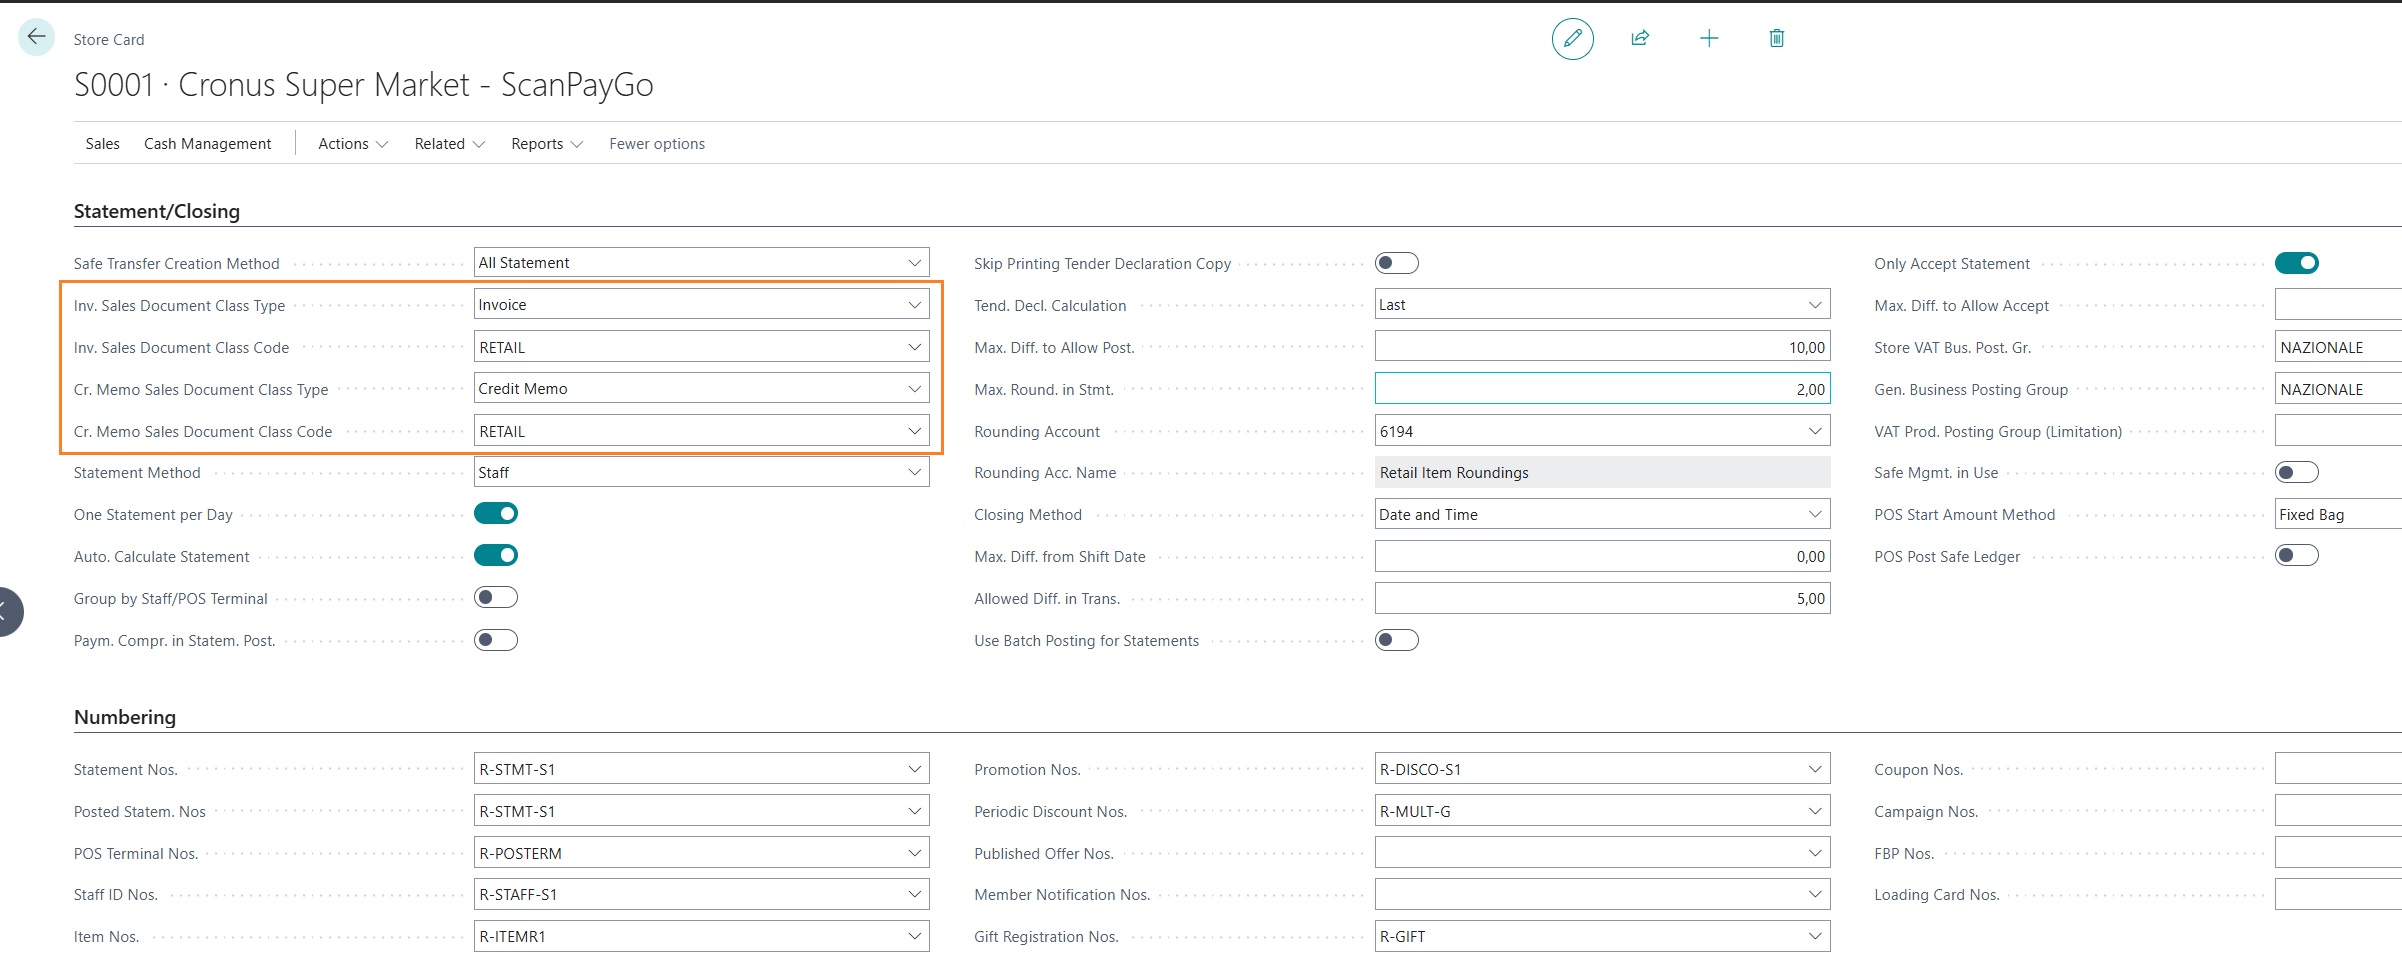
- “Sales Invoice Document Class Type”: indicates the sales document class type to be used for creating sales invoices from the POS
- “Sales Invoice Document Class Code”: indicates the sales document class code to be used for creating sales invoices from the POS
- “Sales Credit Memo Document Class Type”: indicates the sales document class type to be used for creating sales credit memos from the POS
- “Sales Credit Memo Document Class Code”: indicates the sales document class code to be used for creating sales credit memos from the POS
Additional Setup
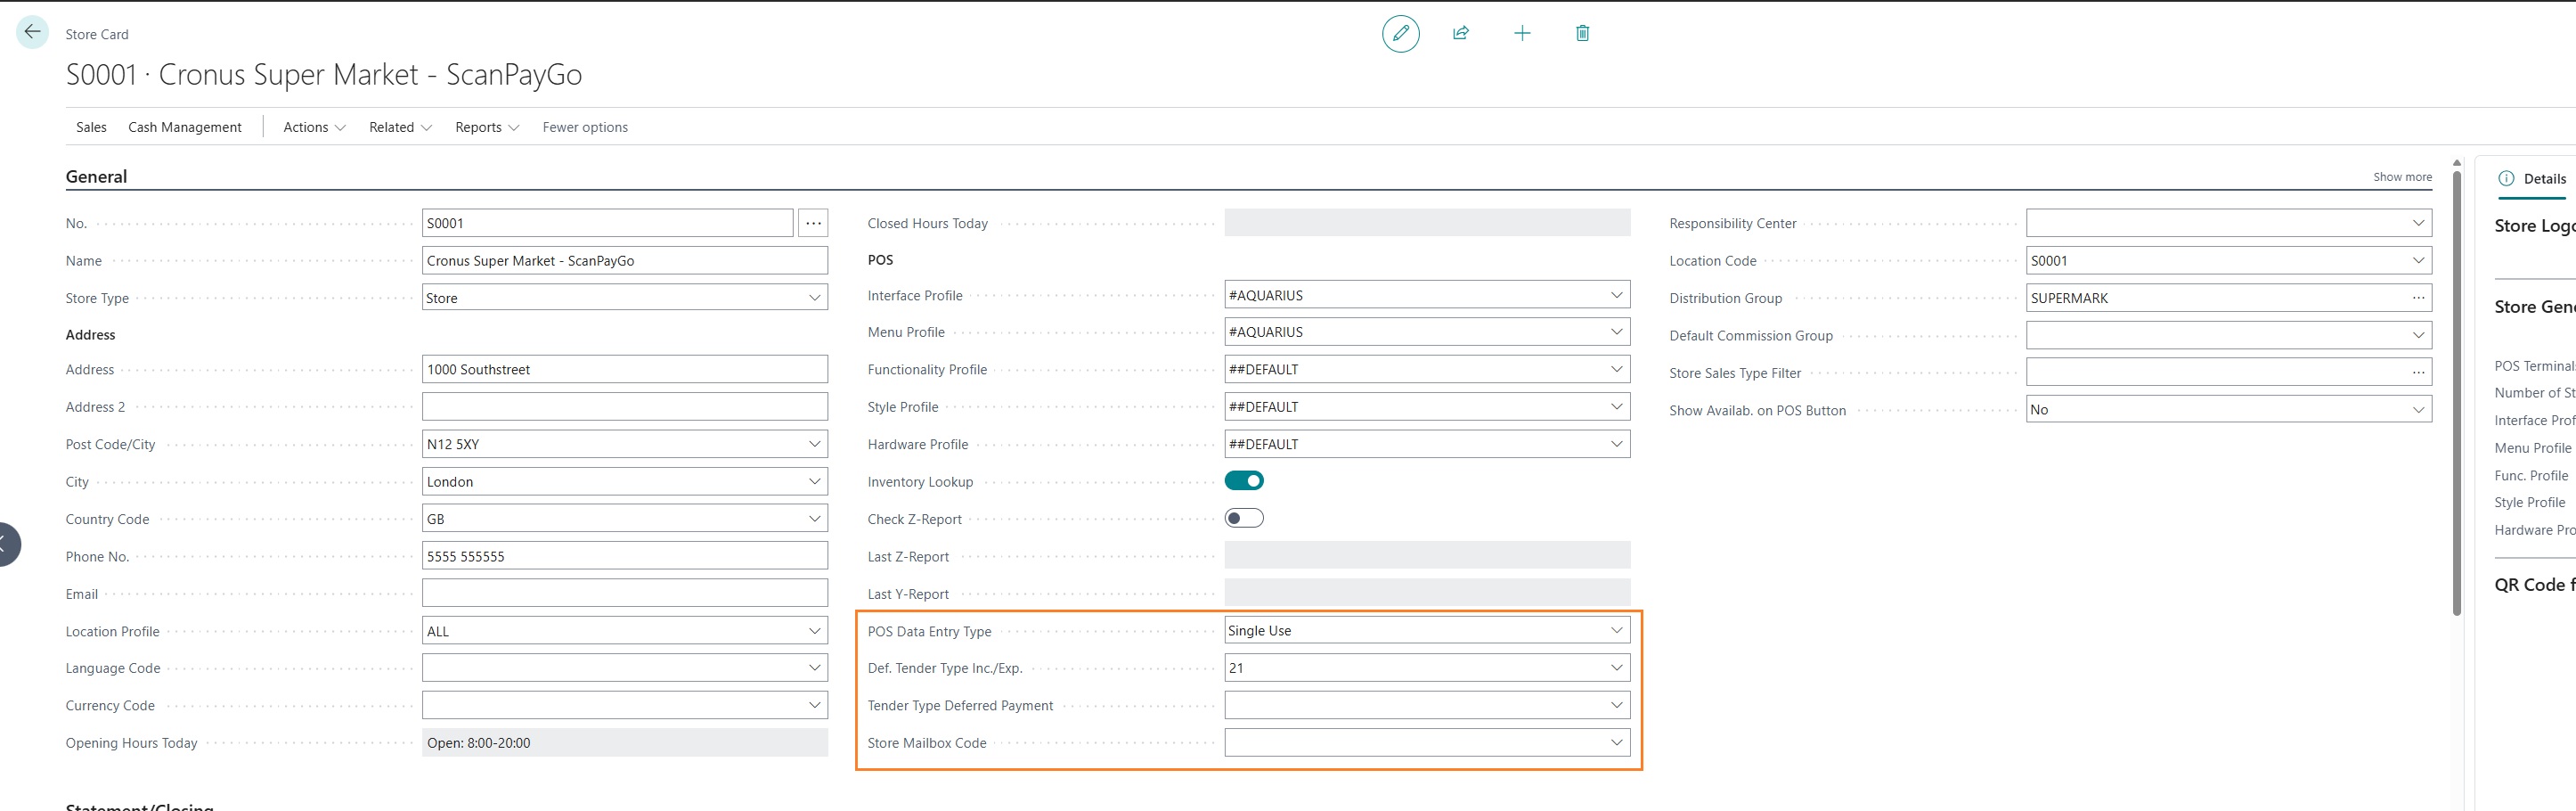
- “POS Data Entry Type”: indicates whether the system must manage the issuance of vouchers as ‘single-use vouchers’ or ‘multi-use vouchers’.
- “Def. Tender Type Inc.Exp.”: indicates the payment method that identifies the issuance of a single-use voucher from the POS.
- “Tender Type Deferred Payment”: indicates the payment method that identifies a “deferred” payment. If a customer is assigned deferred payment for a sale, meaning not settled directly at the cash register, the transaction is automatically closed with the default payment method specified in the store master data.
- “Store Mailbox Code”: not used
Classi e causali
Reason Codes
f you want to enable the issuance of sales invoices or credit memos from the POS, you must create at least one reason code. The reason must then be specified as the default for document classes of type Invoice and Credit Memo.
The reasons created for this purpose must have:
- “Posting Policy” = “Statistic Document (No Ledger Entries)
- “Item Entries Policy” = “No Item Entries”

Sales Document Class
In addition to defining at least one reason as described in the previous section, it is necessary to create at least one sales document class for invoice documents and one for credit memo documents.
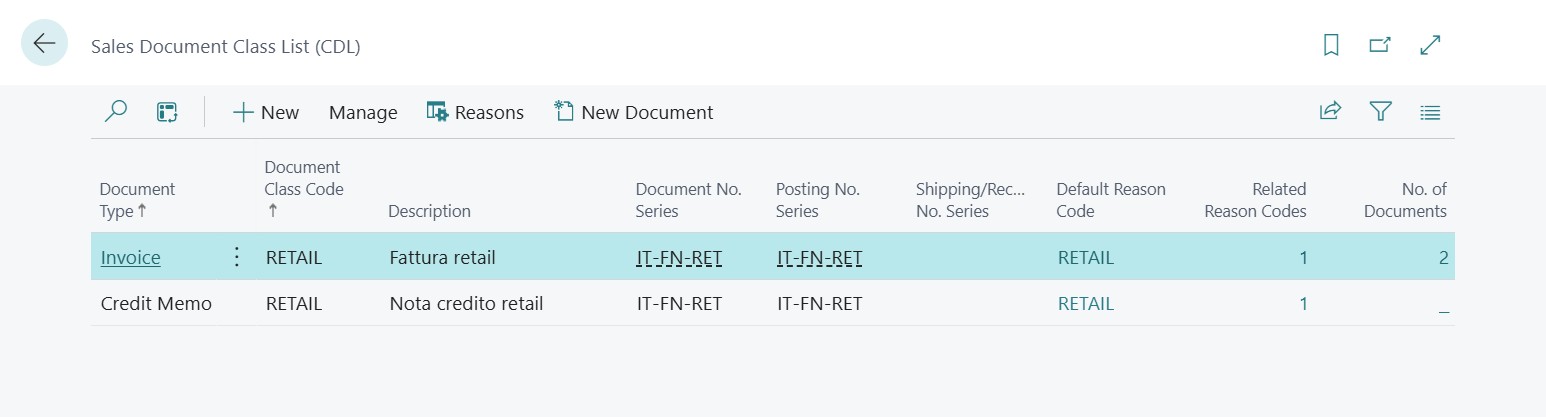
The document number series and the posting number series specified for each document class must be different from those used for non-retail sales invoices and credit memos.
Each class created must also be linked to the previously created reason and defined as the default reason for the class.
The two classes must then be added to each store master record if that store is required to issue sales invoices and credit memos from the POS.
Azioni POS
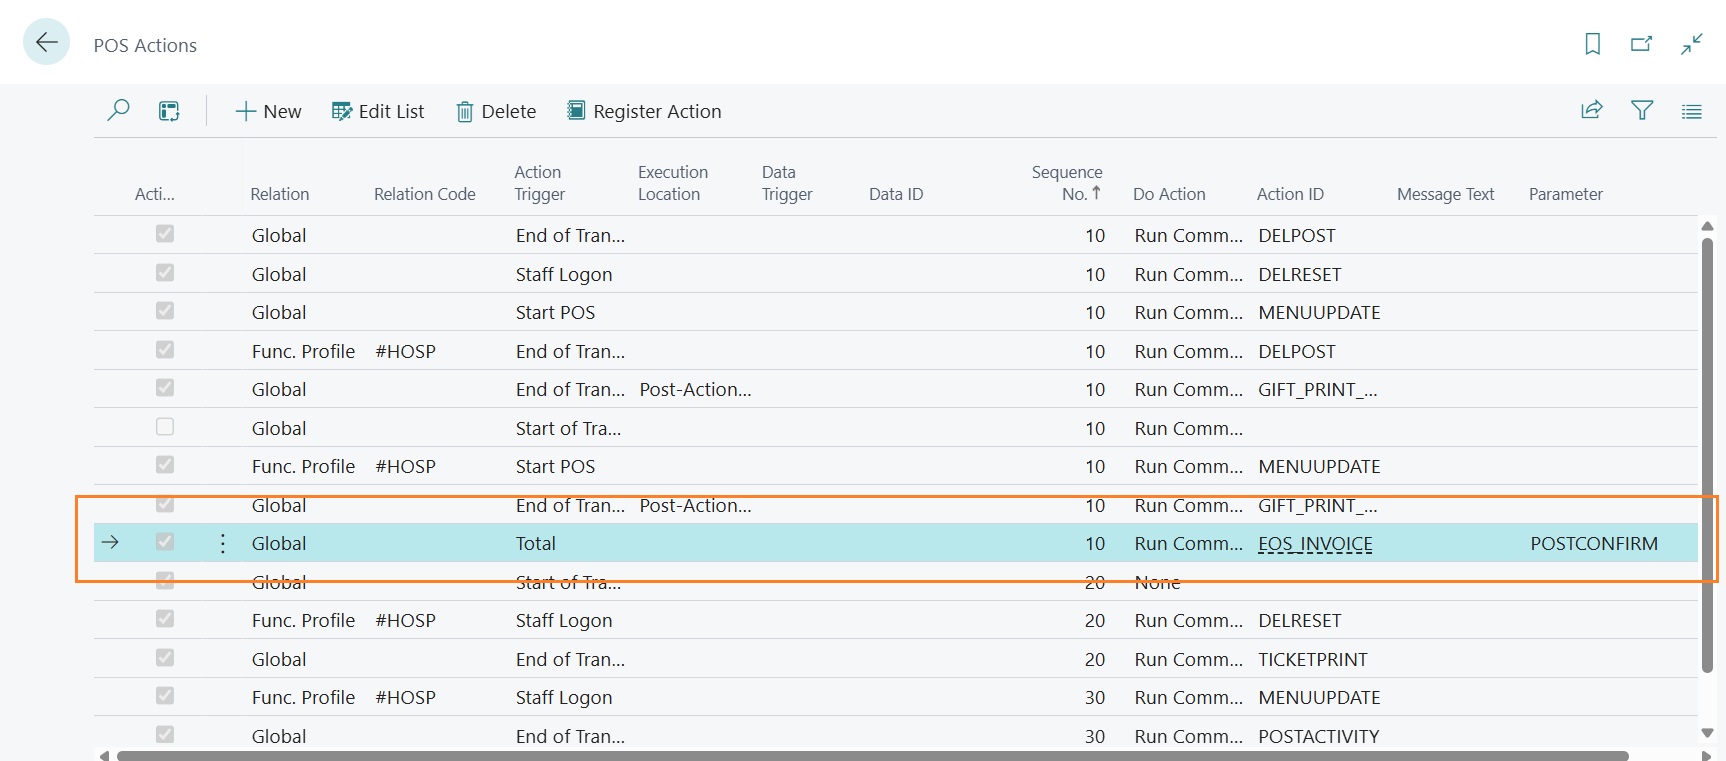
POS Actions
To enable the selection of the invoice type (immediate or deferred) to be issued from the POS, or more generally to allow the creation of an invoice or credit memo at the POS, it is necessary to define a specific POS action.
Web Services
Web service
The app requires the creation and use of some additional web services beyond those standard in LS Central. It is therefore necessary to first publish these web services in the head office and then create the Web Services v2.0 setup as required by LS Central.
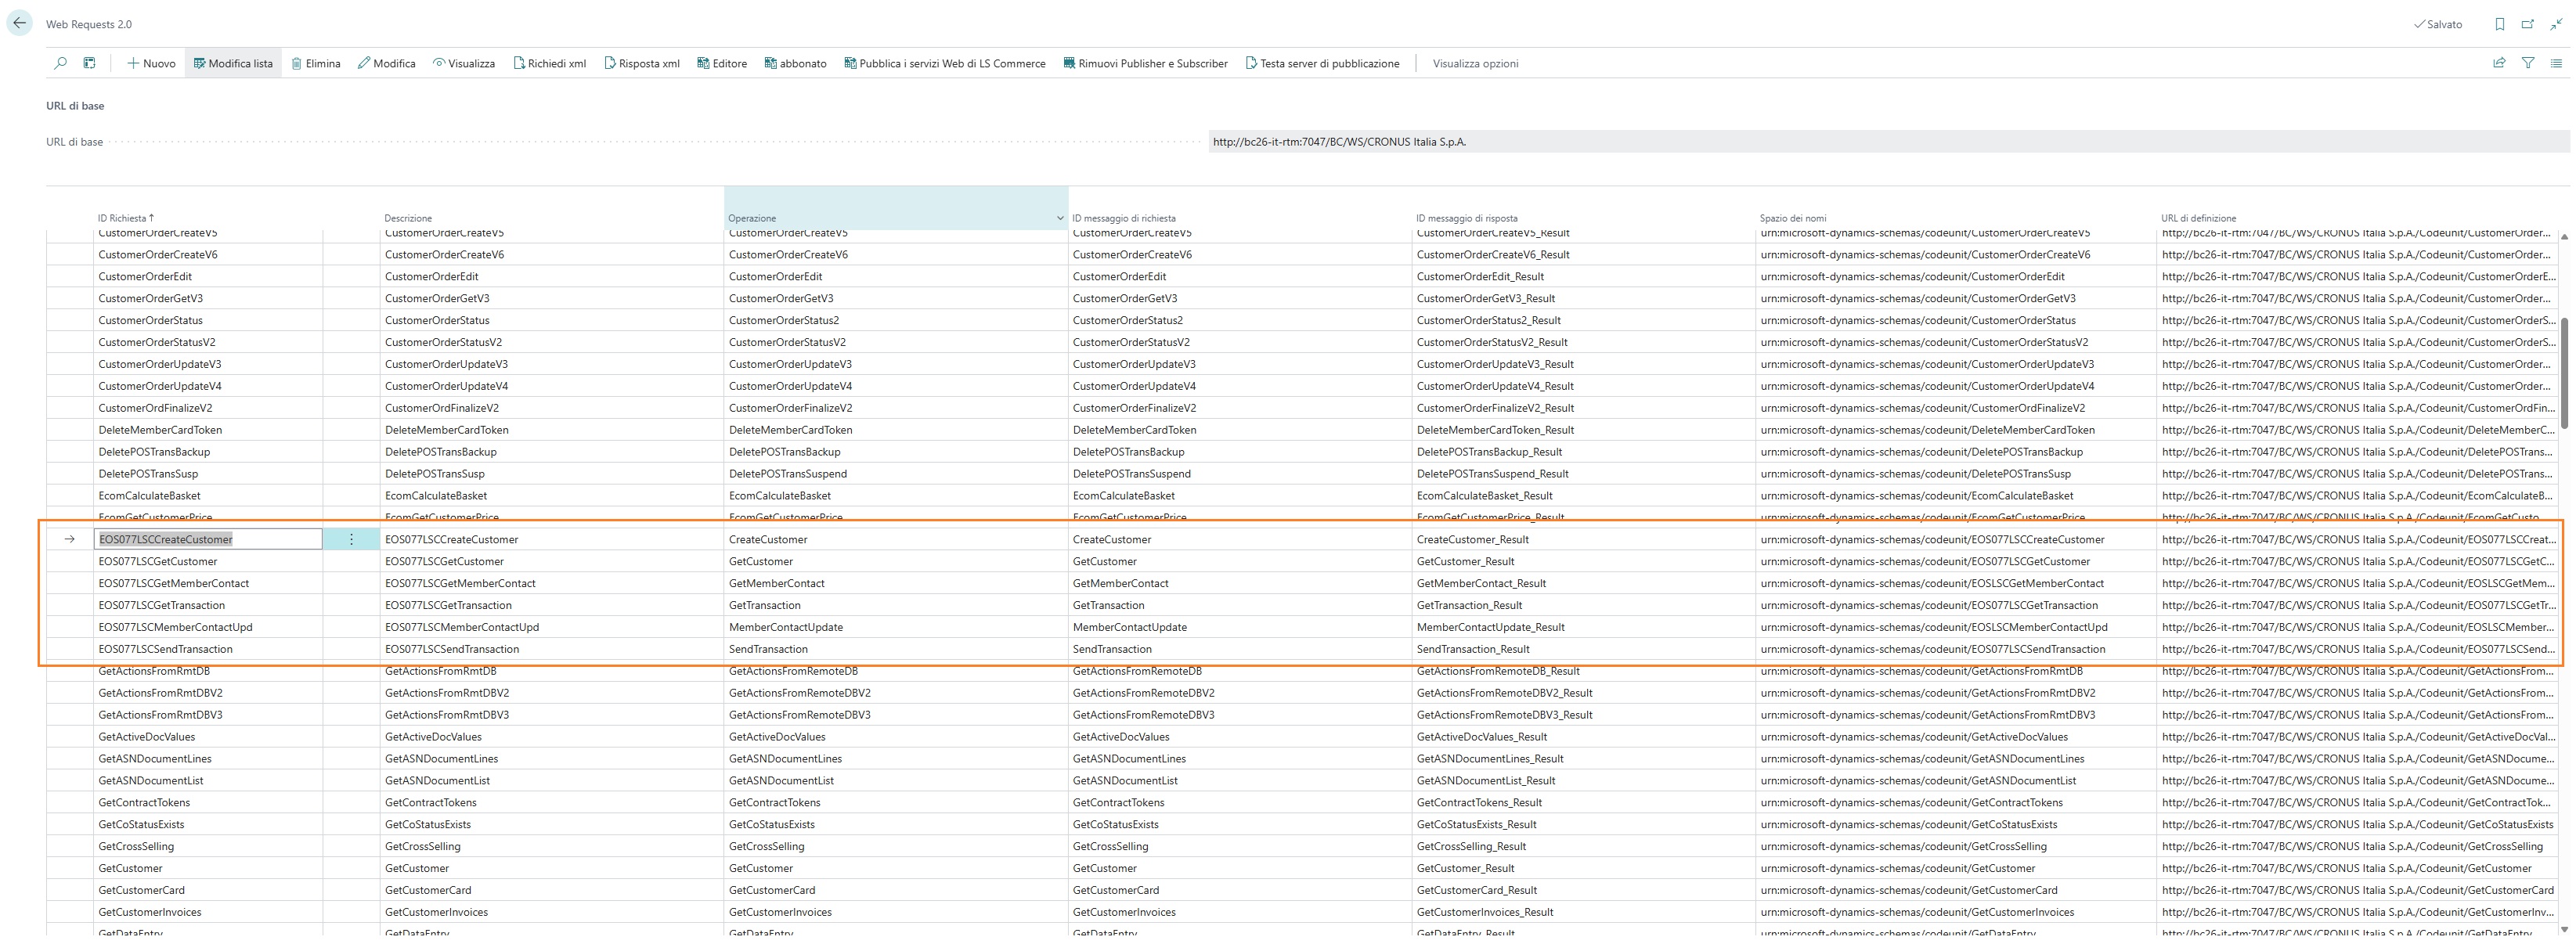
Web Service V2.0
After correctly creating and publishing the web services as described in the previous section, it is necessary to register these web services under Web Requests 2.0. Then, access the LS Central web services setup.
Open the Web Requests V2.0 list and insert a record for each web request that needs to be activated.
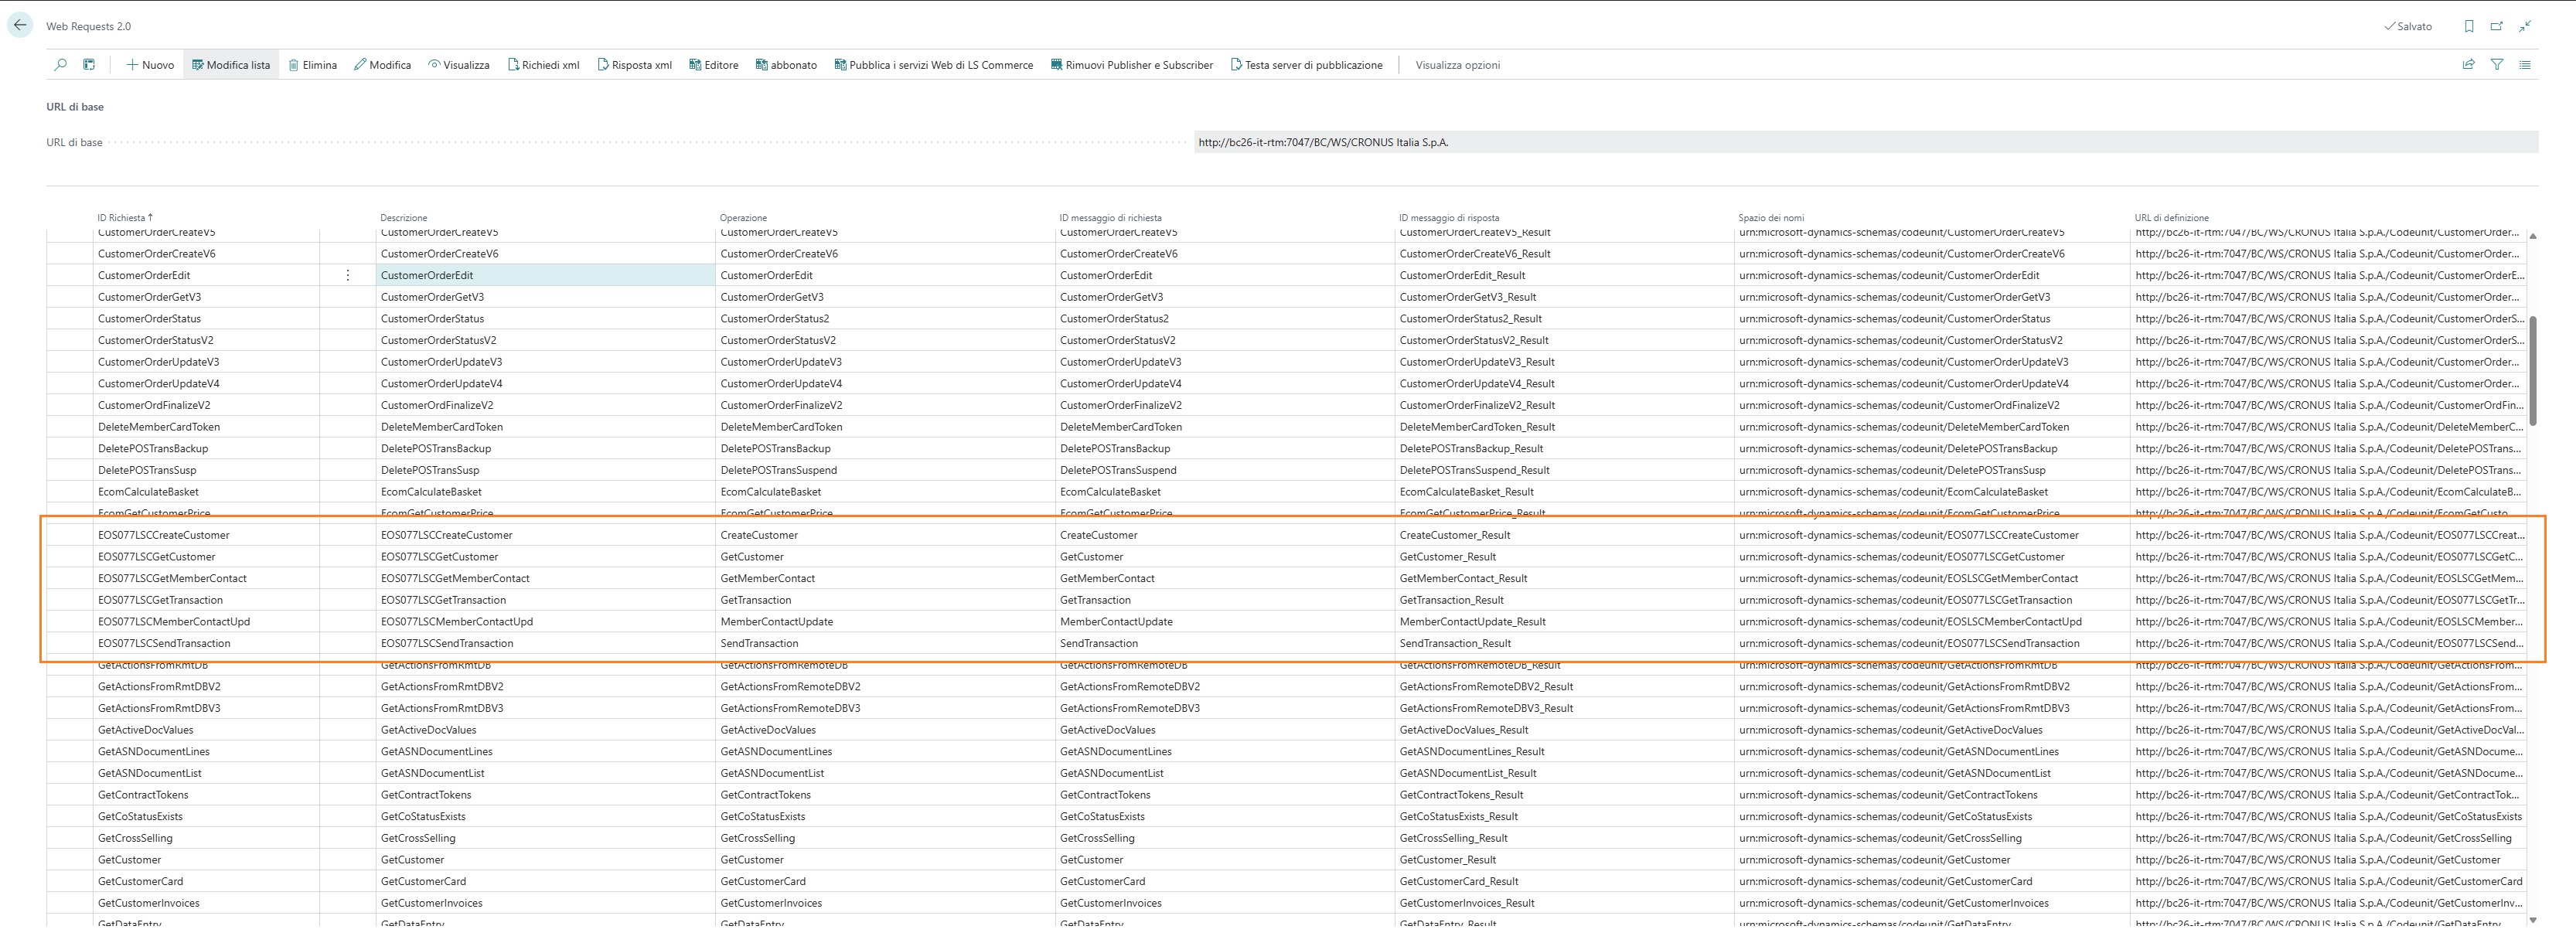
For each record entered, execute the “Registration Request” action.

Codici comunali
Municipal Codes
To ensure the correct assignment of the city of birth from the tax code when creating a member, it is necessary to import or otherwise populate the Municipal Codes table.
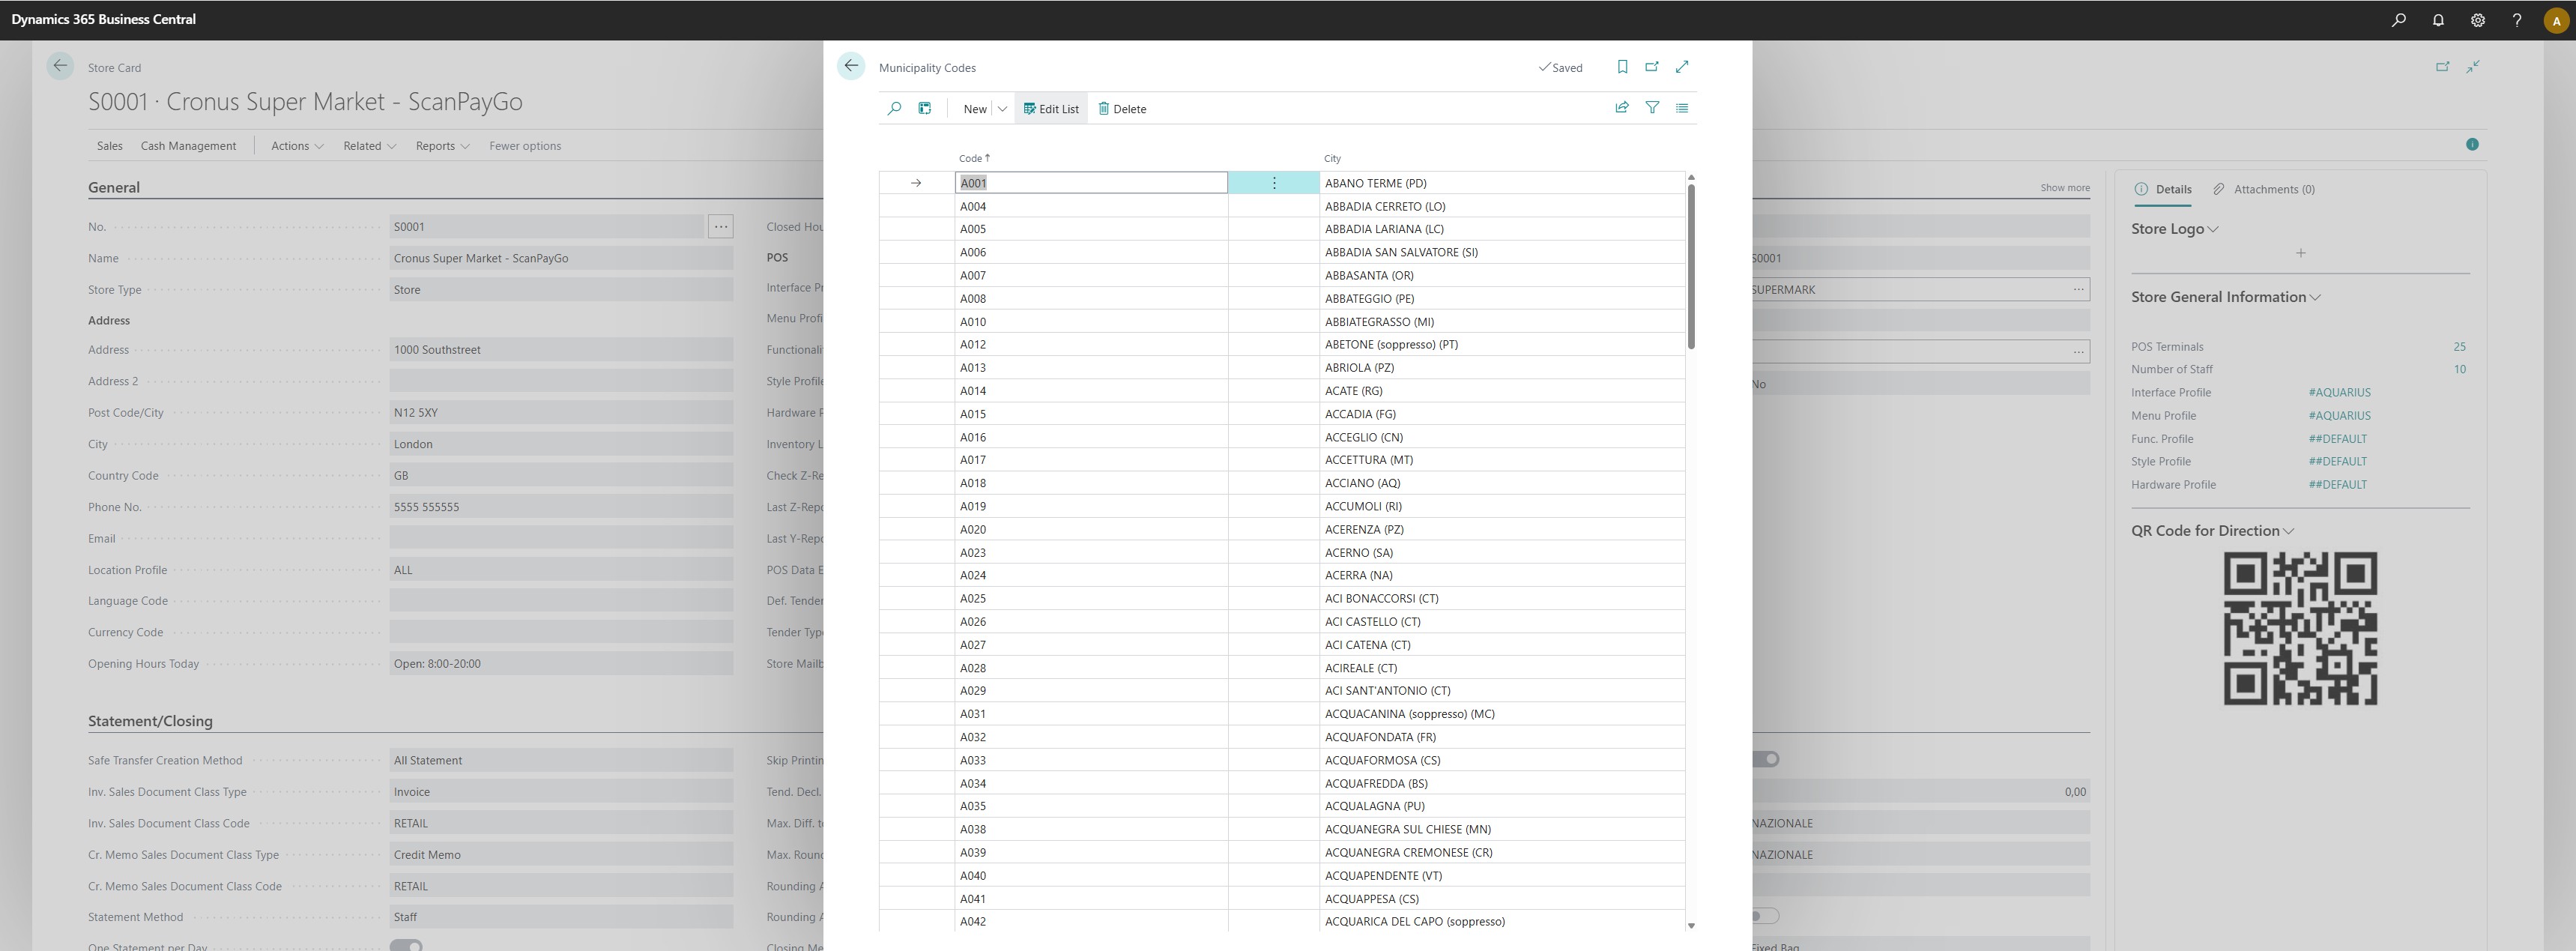
The table consists of the following fields:
- Code: indicates the municipal code as defined on the Italian Tax Authority portal
- City: indicates the city corresponding to the municipal code entered in the Code field
Importing Municipal Codes
It is possible to import a CSV file containing the list of municipal codes using the “Import data from file” function.
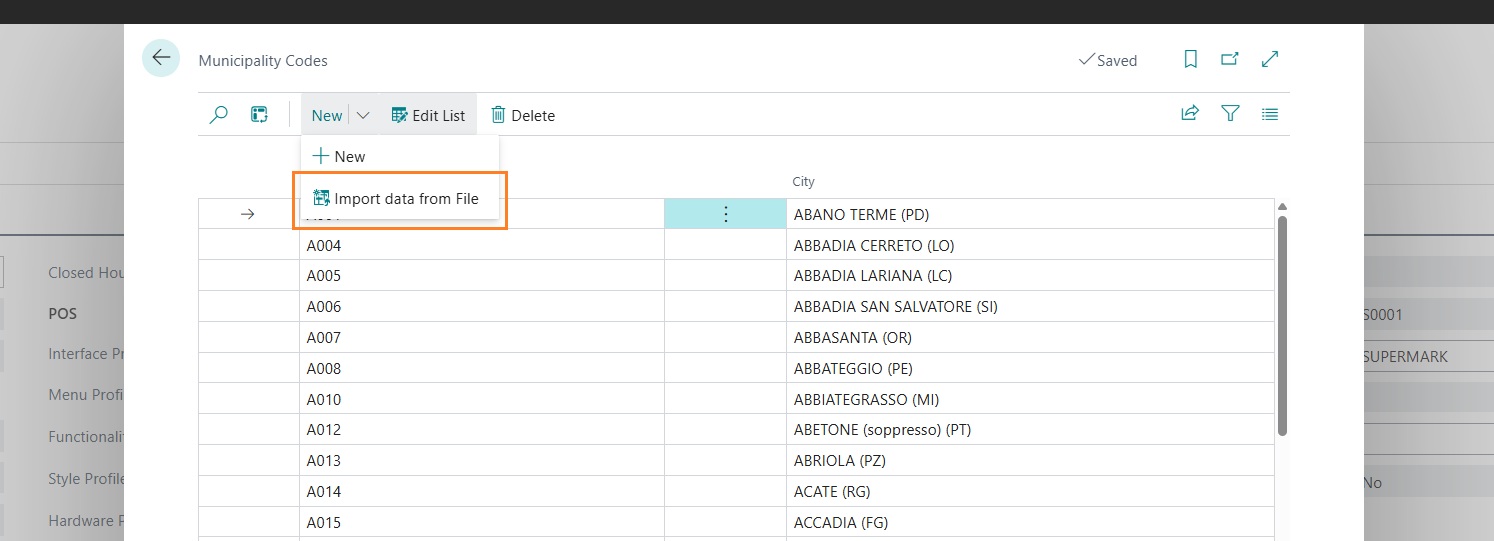
When executing the function, a new page will open where it is possible to:
- Select the CSV file to import
- Specify the field delimiter (default ;)
- Indicate whether the first row in the file is a header and therefore should not be imported

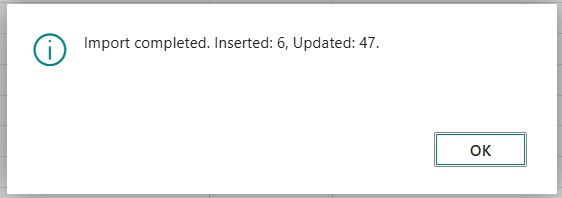
Once the file has been imported, if no errors are found, the system will display the following confirmation message:
Feedback
Was this page helpful?
Glad to hear it! Please tell us how we can improve.
Sorry to hear that. Please tell us how we can improve.