How to configure Azure app, App Key and Secret
Innanzitutto effettuare il Log in a Microsoft Azure (https://portal.azure.com/#home)
Attenzione!
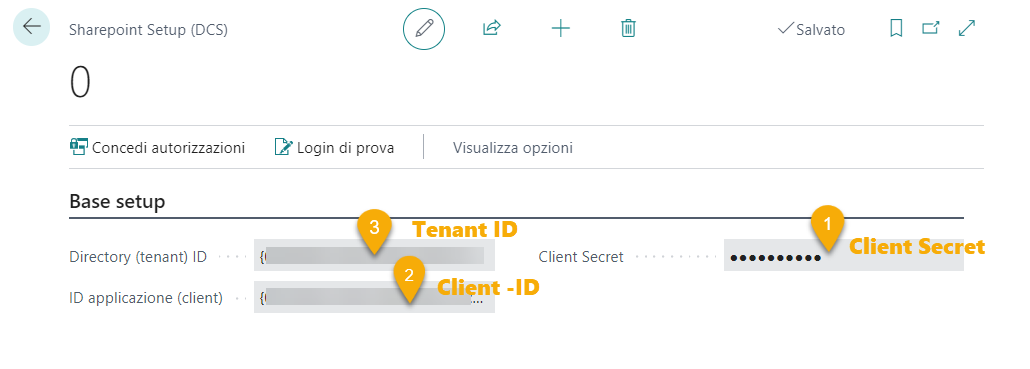
Al termine della procedura copiando Key e Secret in Business Central a non invertire i valori !! - how to configure azure app, app key and secret/1_EX069.03 Azure Setup.png)
cercare “App registration”
 - how to configure azure app, app key and secret/2_EX069.03 APP Reg.png)
Aprire “New registration” e inserire Name e URL callback:
 - how to configure azure app, app key and secret/3_CallBack.png)
| SaaS | inserire https://businesscentral.dynamics.com/OAuthLanding.htm |
|---|---|
| onPrem | URL/NomeIstanza/OAuthLanding.htm (es. http://localhost:8080/BC160/OAuthLanding.htm) |
Premere Register.
Authentication
In Authentication impostare i flag a true di “Access Tokens” e “ID Tokens”. Mettere a Yes il flag “Allow public client flow”. Salvare.
 - how to configure azure app, app key and secret/4_EX069.03 Authent.png)
Certificate & Secrets
In Certificate & Secrets cliccare add a “New Client Secret” impostare la scadenza a “Never”.
Una Volta Creato deve essere copiato e salvato da qualche parte (sarà visibile solamente durante la creazione)
 - how to configure azure app, app key and secret/1_EX069.03 Secret.png)
API Permissions
In API Permissions aggiungere un nuovo permesso di tipo “Microsoft Graph” e svegliere “Application”.
 - how to configure azure app, app key and secret/5_EX069.03 API.png)
Selezionare il permesso “Sites.ReadWrite.All” e cliccare su “Add Permissions”
 - how to configure azure app, app key and secret/6_EX069.03 Permission.png)
Cliccare poi sulla azione “Grant admin consent for X” (farà partire la richiesta di autorizzazione)
 - how to configure azure app, app key and secret/98_EX069.03 Admin GRANT.png)
Infine tornare sulla scheda “Overview” e copiarsi il Client ID ed il Tenant
 - how to configure azure app, app key and secret/99_EX069.03 Copy To ClipBoard.png)
ed incollarli nella page Sharepoint Setup (DCS) all’interno di Business Central

Feedback
Was this page helpful?
Glad to hear it! Please tell us how we can improve.
Sorry to hear that. Please tell us how we can improve.